Sanding drywall is downright painful and don’t get me started on drywall dust: it has a mind of its own if you are not using a drywall sander vacuum (dust extractor).
Bottom line: most folks buy a low-cost drywall sander (not top quality but fine). It’s a US-based company called WEN and this tool is fine for homeowner jobs. Really not for pros, but some pros do use it.
The WEN drywall sander has GREAT, and I do mean great ratings: and it’s fast. See it here. More details just below.
Re-sale value is good for these tools, so pull that trigger, fly through the work, then get at least half your money back.
Here is the drywall sander for every budget: from the pro-type orbital vacuum sander to the ole trusty: pad and stick. See my favorite sander here: expensive, for pros, or serious tool lovers. More on this baby at the bottom. But here are the main homeowner level tools:
Big boy toy: if you want what the pros use… this rig is pricey but worth every penny. Jump down to check it out. Your new franchise!
Bottom line—our top 4 tools for drywall sanding, all from makers of the real-deal pro tools: the first 3 suck great!
- Best for the money: WEN, a decent company, makes the same basic type of orbital drywall sander as the big boys that costs a lot less. Click on the picture for the price. Surprised? Yes, it’s a good deal but it’s not Festool (bottom of page). The WEN company website shows the care they put into their tools. (They’re based in Elgin, Illinois.) More below.
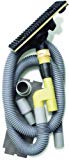
- Want to be neat and sand by hand? Hyde Tools’ hand sander: very good price here. It attaches to the shop-vac like the big boys. Don’t use your house vac! Trust me the dust will kill it. You need a shop vac with a filter to trap the dust. This Hyde is a great little tool made in the USA: check the price here. For the drywall sanding screens (don’t get sandpaper for this one). More on tool, screens, and shop vac below.
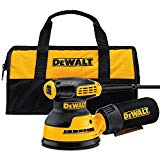
- This painter’s everything sander: the Dewalt 5-inch orbital with dust bag (great for many projects), check price online.
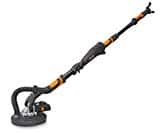
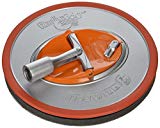
- An un-flippable pole sander (use your broomstick) that’s not like the rectangular ones that flip on you and leave marks. All pros use this now and then: old school drywall sander—improved. See Online here.
More detail on these below, plus the downside of not using dust-extractors, shop-vacs (and how to improvise one).
Drywall Sanders: Top 4
After the best sanders are some ways to control the dust.
You know those ridges left by the wall sander…like dried mud under the paint? That’s because you had a lazy sander. It used to be very hard work.
 Our advice: Cut your time in half and get a good electric drywall sander that sucks…up almost all the dust. Then, re-sell it online: you will get most of your money back: “Only used once” … pros always need a good drywall sander vacuum, plus they will buy your leftover paper.
Of course, you need a respirator: we simplified the crazy, complex world of filters here: for drywall dust, you just need P100 or HEPA filters: look for the kit with the retaining clips.
2. WEN is a company we have come to trust. They make lower-cost power tools like this almost dustless sander that have thousands of great reviews. Our guess is that they want to become accepted with the big boys like PorterCable and DeWalt, then they will raise prices. For a homeowner, this would be a decent choice.
- same 9-inch hook/loop (velcro) paper that the pros use (see the 120-grit drywall sander paper I use)
- the hose is 1.5 inches (get this adapter if your shop vac hose is 2.5″, etc)
- only 9 lbs, and has a telescoping handle: nice job Wen
- hand help version is ½ the price (not worth it in our view)
- comes with some paper, but you’ll appreciate this variety pack
How I use this tool: I start with 80 grit after the first coat of drywall compound is dry just to knock down the big chips. Then a quick blast with 120 grit and then more mud. For the final sanding I give a quick touch with 12- then use 220. In other cases, I feel 120 is enough.
New to this? Experiment with how much drywall board (paper) can take before you scratch it. You will get the hang of just keeping the drywall sander head on the dry mud.
3. Hyde’s hand block vacuum pad: drywall sander with a vacuum attachment comes vacuum hose adapters for any dust trapping canister style vac. Hyde also sells a similar one that has no pole attachment (save about 10 bucks). DON’T USE SANDPAPER: You need the dust to get sucked through a screen!
Get the Norton washable drywall sanding screens.
- only 3 ounces (plus the weight of the hose)
- snap-lock, not wing nuts to hold sanding screens in place (thank you Hyde)
- comes with hose adapters for different shop vacs
- must use sanding screens, for drywall sanding: not sandpaper
Comes with a 6-foot hose, so if you have high work, you’ll have to put the vac on a stand or get a longer hose (see below for the extensions).
4. Dewalt Orbital 5-Inch
If you are not doing a very large job, this will handle it, but your arms will need rest after you are done. The nice thing is that this is a workhorse tool for so many other things you will do…and you will leave it to your grandkids. DeWalt is quality. Here are 5-inch sanding discs: fast change hook-n-loop.
- you’ll love the dust catcher system you change with one hand: others are clumsy
- the dust bag gets most of the drywall dust but gets 100% of sawdust
- optional shop vac hose connector (1¼ inch) that swivels
- larger hose adapters below
- sanding drywall with an orbital sander is a bit messier
5. Old school: pole sander head, fits threads for a broomstick/painting pole, but also comes with ‘free’ adapter for (use with our main quick-lock paint roller pole). All pros have one of these. Use this “hook-n-loop” 9″ sandpaper. The paper is fast to change, unlike the ‘old school’ with screw clamps, uggg.
No dust control, but look at the price, and:
- does not flip (which causes new dents in new sheetrock)
- lowest-cost way to get the prep done
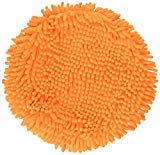
- can be paired with a washable duster head shown (necessary before priming)
- does not control dust
- metal ones are better than the plastic: metal spreads the force evenly from the pole: that’s very important
- it’s not heavy-metal, Judas
Vacs, and other associated drywall sanding tools
The main thing today making your drywall sander into a virtually dustless drywall sander when it is connected to a dust collector—but you have to get the filter.

IMPORTANT: You cannot use your regular shop vac for this ultra-fine dust—it will kill your upright carpet vac in one use—and instantly void your warranty.
- “Low-dust” drywall compound (mud) is supposed to sand off in larger particles: but in reality, it floats for hundreds of yards
- The best way to clean up drywall dust off the floor and walls
- These vacs are not just for dustless drywall sanders with vacuum attachments
Without dust trapping ability, you’ll blow this stuff all over the house.
Here comes my favorite all-around shop-vac, and the very best for drywall dust collection.
I researched drywall sanding dust and shop vacs to handle it… and DeWalt wins the day, with a close runner-up (below), both made in the USA.
I picked two: the DeWalt 10-gallon and the slightly bigger DeWalt 14-gallon. Few other brands are sold in drywall supply stores that pair the DeWalt with the Porter-Cable drywall sander shown at the top.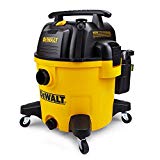
- Washable filter: you’ll want to stop after sanding a while with your drywall sander
- The 10 gallon uses “Quiet Technology” which other DeWalt models lack and they claim that it is built to live twice as long. Why do they only put this in some models? Don’t know.
- The 14 gallon has large rear wheels and a cart handle, (yeah, baby), and actually costs about the same.
Long cord, about the same number of horses, and a tank drain.
In addition to the washable cartridge filter, there are different bag-type filters explained below.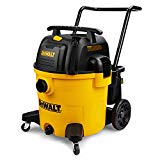
The filters are easy to find with the model numbers
Start by clicking here, then simply search for the model numbers in bold:
Washable Cartridges
- The “standard” cartridge comes with the unit (1.0 micron, DXVC6914).
- Add the fine (.3 micron, DXVC6914, about 30 bucks).
- Add the very fine, HEPA (.3 micron, DXVC6914, about 40 bucks).
We had never before seen a washable HEPA filter for a shop-vac. Nice going DeWalt.
Filter bags
- use with 2 types filters for whatever the job calls for and they are not expensive for a change (average 5 bucks each)
- fleece bag DWV9402 (concrete, wood, drywall dust)
- dustbag – DWV9401 (concrete, wood, drywall dust)
Runner-up 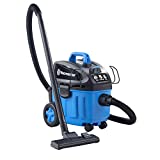
The Vacmaster 4 Gallon with a washable cartridge filter. Big power, small price won me over when I saw this.
- 5 HP
- Washable filter: accept no less
- Tool containment: everything has a place
- 15-foot cord: thank you
You have the option for 2.5, 4, 5, or 6-gallon sizes, and the 5 comes in 3 HP or 5 HP.
Look out DeWalt and ShopVac.
Honorable mention is this surprisingly powerful and stable 1.5-gallon unit from Shop-Vac. I have had one of these for years* and: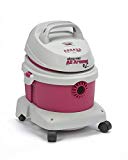
- uses washable filters that go a long time: just love that.
- downside: you have to clean the filter after suctioning up drywall dust for 20 minutes, but that goes fast: we have washed some 50 times
- recommended for non-pros
- works with reusable filters: the best deal is from Shop-Vac, not China!
Here is our video of one way to trap the dust as you sand using an older model. We travel with this powerful mini Shop-Vac everywhere: it is strong enough to pull paint out of carpet: thank you, thank you, thank you.
* I keep my old one dedicated to just cleaning my chimney after brushing: read how I clean my chimney.
Shop-vac hose adapters
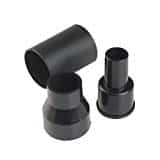 These adapters should work for almost any hose and any vac, but measure your hose: size matters.
This particular adapter is 1.5 to 2.5 inches (for the WEN above).
Counting for wall thickness, you will get, for the inner diameter (ID) about 1+3/16″. They are tapered so they will fit if you are close.
Extension hoses, adapters
These plastic ends taper so they will snug up when you install the one that you want.
- 1.25-inch diameter, 8 feet of hose with 3 end types to fit most vacs (optional wands and nozzles)
- here is a 2.5 inch 20-footer
- You can find just the hose if you are willing to add the fittings on each end: this would be the lowest-cost option.
Wipe down your walls before priming/painting or your walls end up feeling like sandpaper:
Complete info for drywall priming and painting:
- How to prime with a good primer
- Painting drywall is straightforward
Before priming, you must dust the walls—start with the ceiling (even if you did no ceiling sanding…the dust flies up and sticks!)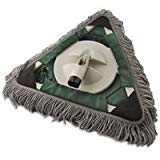
You can use any broom, but a treated pad is the fastest and you will wipe down twice. This is a Wooster product (well-known to us in the biz) and it really grabs the dust. Never wash it: just shake it off outside. The shape fits into all corners and it is designed not to flip over.
Wooster is a paint/drywall tool company brand all the pros use, as much as Purdy and Benjamin Moore.
Use with a broomstick or the standard painter’s quick-lock types.
We use these for general house cleaning as well.
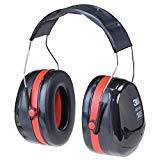 Ear protection is helpful with shop-vacs and sanders (as you know).
A good work light is key to finding ridges before the primer (when everybody will see them).
FUN TIME: Improvised dust-trapping shop-vac.
This video is a copy of a buddy’s idea to trap dust in water in the chamber of the vac with just the large-particle foam filter. We wonder if all the resistance we created will kill our motor. It’s a risk.
FAQ: What about wet drywall sanding? Meh. It’s only ok for drywall sanding the 1st coat of mud at best. It does a poor job: the topcoats must be dry sanded unless you just don’t care. Fredo, don’t break my heart.
Here is a short video showing that wet sanding ain’t all it’s cracked up to be.
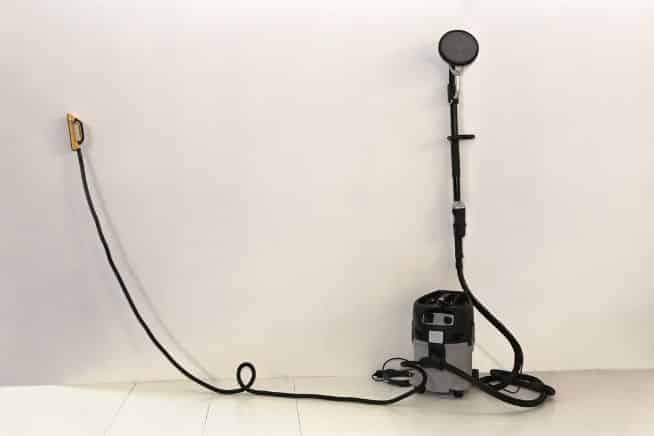
Pro’s Ultimate Drywall Sander: the Festool Planex LHS-E 225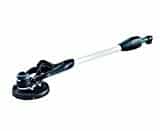
(Pricey, but extra speed and no clean up pays for itself quickly)
This drywall sander is my choice. Festool makes others, but this hits the sweet spot of affordability and ease of use, especially for ceilings. This unit was designed to be paired with the CT 36 Dust Extractor in mind (see just below).
Redesigned by Festool based on customer feedback: no drive shaft so you can have a flexible head,
Comparing the upgraded model (the LHS 2 225) I see they added light and about 600 dollars. Well, it’s better in other ways, but the LHS-E 225 is just as good in my view. They should keep their prices down, but they are quality made, so you get what you pay for.
- Great reach
- The variable speed at trigger level
- Remove part of the guard quickly for inner corners
- Best used with Festool extractor just below
- Very low weight
- Direct-drive brushless motor and flexible head joint
- Storage bag (sells for 160 separately)
- Covered by Festool 3-year service all-inclusive warranty
Only weighs about 8lbs, so it’s going to be manageable all day over your head.
Dust actually gets sucked from the outer edge and the slightly curved head reduces vibration. That’s only on the “Easy” model you see here.
I recommend you add on the shoulder harness if you do a lot of ceilings unless your name is Schwarzenegger.
Your clients will notice the neatness more than the smooth walls. Pros: you want this.
Paper: You need to buy the paper with the same pattern of holes for the vacuum outlet: this is how the system works.
Yes, the Granat abrasives (here’s the 120 grit)… are a bit more expensive but they really last. They are about a buck each.
Here is the 220 grit for the final light sanding. You mostly only need the 120 for this best drywall sander.
Download the manual for the Festool 571935 Drywall Sander LHS-E 225
This drywall sander is pricey but remember that Festool makes designs to make us money. Here is the sales video, by a paid pro.
Pro’s Dust Extractor 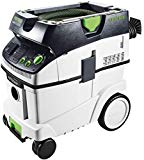
The Festool CT 36 was made for the sander above: it has the correct hose and auto-clean feature and was designed to be paired with the Planex E 225 above.
And it’s not loud. Thank you, FT.
Amazon has a competitive price and free shipping.
You get 36 L (9.5 gal) capacity. I’ve looked at the larger and smaller versions but the 36 is enough to work for a long time without stopping. Is the 48 worth the extra money? I’d say 36 is enough.
What’s the auto-clean? It’s just a burst of air to clean the HEPA filter for continuous use. Nice to not have to stop and clean.
The HEPA filters are not washable, but you can clean without water many times with a brush before replacing and the replacement is easy to find. Festool says with all-day use the HEPA filter lasts at least 2 months. In practice it’s a lot more. It’s 100 around the net, but amazon has it for 40. Cool.
The CT 36 has:
- tool trigger startup
- variable suction control
- 11.5 foot hose, 25′ cord
- virtually dust-free sanding
- self-clean filter bag
- anti-static feature
- hose and cable wind up space
- 3-year warranty
- 33 lbs, and a locking brake
- more features, but this is the meat
Made in Germany, so you know it’s well-made.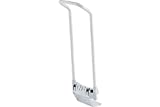
Add a pull handle for about another hundred? Maybe worth it, but it’s got wheels and you’ll pull it around with your hose. But at almost 29 lbs, it’s a lot to lift every day.
Download the Festool CT 15 Dust Extractor manual
You’ll love the flat tabletop for your beer.
Option I don’t recommend is an extension to the pole. If you don’t like stilts or ladders, you might want to add 20 inches to your, uh, length. This only adds one lb. of weight and gives you more leverage with your lower hand. For the price (well over 200! ), it seems too much, but I know some of you will want it.![]()
Eventually, OSHA will regulate collection rates more strictly: they have been moving that way. You’ll be ready with a HEPA-rated system.
Festool’s video: getting started, and some of its features
Related:
Painting Drywall with how-to steps
Best Drywall Primer and how to do it
Let me know in the comments if you have a question: I see them daily.
Thanks for sharing your knowledge! I’m getting ready to repaint my interior. My walls are flat, with little to no texture. They are in very good shape. Would I want to use a WEN to sand them all? I’m doing the entire house including a room with walls up to 11 feet. I’m not looking forward to sanding! But I’m afraid of getting carried away with an electric sander and causing damage to my wall. I plan to use a good primer followed by Ben Moore Regal Select.
Hi. If your walls are painted, there’s no need for an enormous amount of sanding. Just take a sheet of say, 120 grit folded up or wrapped around a block, and go over the walls with your free hand and feel for ‘ticks’ that were dried in the paint last time and knock them off with your other hand. Very quick process.
I’m assuming you have interior latex now and you’re putting on interior latex. Oil is a different animal.
Primer is a good first step if you’re changing colors drastically, but test to see if 2 coats (with the roller) are enough to cover. Primer would just make sure you cover in 2. Primers are not needed generally. Read my primer post(s). Stains, yes. Porous, yes. Prepainted, no, in general.
Hope this helps!
Yes, it definitely helps!
Yes, I’m using latex over latex. And my new color is a little darker than the old color. So, I think I’ll just stick to the 2 coats of Regal Select.
Thanks again for sharing your knowledge. I’m sure this will help save me a lot of time but still ensure I do a good job!
Good info. I have an existing coat of paint on my bathroom, but it had started to flake/chip so I had to do a LOT of scraping. Then I had to smooth things out with a thin coat of mud over half of the wall surface. So now based on what you say about flashing I’m not sure if two regular coats of paint will work or if I need a coat of drywall primer to even out the mud.
Sounds like you did it right. You definitely need primer before your paint or it will flash. No harm priming the old paint as well, to ensure an even take-up of the new paint. Look with a light at the sanding job: hold the light at a sharp angle, and if you see shadows or mounds, sand a bit more. It’s very hard as you now know, to sand after painting. Primer does sand a little easier, but still… get it now!
Good luck
Hello! My fiance and I are renovating a mobile home of her aunts for us to move into. Our son’s room has two original walls (mdf board I believe) that originally had wallpaper and two walls a previous tenant replaced with drywall. Well, I started to sand through about 3 or 4 layers of paint as well as wall texture that was hideous. The top portion of one panel took me about 45 minutes with an electric sander and 60 grit sandpaper. The stuff was thick! While I was at work one day a couple of weeks ago, my fiance thought it a good idea to just start peeling the paint and wallpaper off the walls. 🤦🏽♂️ I assume because it was quicker and she has no patience for tedious work. So, now I am faced with 3 of 4 walls that have no white paper covering and are down to the brown paper. Two of the walls are the original and one is sheetrock. I lightly sanded over some of the brown paper by hand to get it somewhat smooth and to stop balling up underneath the sandpaper on the first panel. I used Zinssers oil-based primer for stains, white can with brown background, on that panel as well as the second that I got lazy on and didn’t sand as well as the first. The first panel looked good and seemed to take really well. The second blistered. My question is, will using that primer on all the walls make them able to be just painted again or will they have to be replaced? We are just trying to do the most cost effective thing right now. Thank you for your time.
Hi. Hard for me to be sure since I cannot see it, but it sounds like there is a low cost way to make them as nice as any new wall: and it sounds like you have the time… which is what it will take.
The answer seems to be “skim-coating”. This is when you put a thin coat of drywall compound on the entire wall then sand flat, prime with drywall primer linked on this page, then 2 coats of paint. It’s expensive to have a pro, but you can do it. Just watch it done on youtube. This will make the walls flat and any paper, the texture and imperfections will be covered.
Generally, latex paint is not something you can sand. Oil, yes, latex no.
If you send me a photo or 3 I’ll be able to know if this is good advice, but it’s the best I can do for now.
The primer you used is more powerful than you needed: it’s mostly for stains…but no harm is done…just spent too much money!
If you skim coat, use the basic drywall primer then look to see if stains come thru…then spot prime with the Zinssers.
Good luck!
b