
For you perfectionists, see your special section below the videos.
For our technique to work well, you need quality tools (if not the bristles fall out of your brush!) Start with my favorite brush. We use other tools shown below.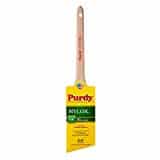
The three routine issues to know how to touch up paint:
- Color matching: It is not always possible to achieve an invisible touch-up. Even if you have the original can of paint, it likely won’t match. More below.
- Texture matching this means the roller stipple/brush marks as well as the results of your repair. Not hard to do. This is not essential knowledge for knowing how to touch up paint.
- Flashing gloss: Here is the biggest problem when it comes to how to touch up paint: Flashing is when the paint you touched up is not the same gloss as the rest of the wall. Explained below.
General steps:
How to touch up your painted walls
This section is followed by a closer look at what can go wrong.
Small nail and push-pin holes are super easy: use fingertip (no knife here) to fill with non-shrink spackle, wipe excess, do not prime! If this is all you have, you don’t need to read further about how to touch up paint, but there are some recommendations on spackle etc.
All the tools you could possibly need are in our tool list post just for painting.
Touch Up Paint in 4 Steps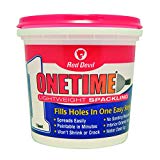
- Small holes/dents not larger than a pencil eraser: Dust loose particles, fill the indentation with lightweight spackle with a putty knife (painters use the 5-in-1 shown below), let dry, sand (this one has assorted grits), dust with a dry rag.
- Primer? Only if bigger than a nail hole (often we ‘prime’ with the finish paint, if not a large patch)
- Paint: Use the original paint if you can (which often will not match – see why below)
- Finishing touch: Let dry and re-coat at least one more time, twice if flashing (explained below)
Expanding this a bit:
Choose your weapons well. Is it bigger than a breadbox? uh, I mean nail hole? Yes? Skip down to “Spackle”. No? Just use your fingertip to fill the small holes. Use lightweight spackle and wipe off the excess with a barely damp rag or your hand. This stuff does not shink requiring more coats of spackle, like older type spackles. This stuff changed my life. Speed, man. You can paint it right away! or not.
It’s true what they say, “Sometimes you have to dig that hole deeper to get out of it.” A dent will sometimes cause a bulge above the surface… so you just use the butt end of your putty knife or even a hammer, and gently push into the wall. Then …
Spackle. Don’t use tools! Use your finger if it is a small repair (sculpt the filler leaving a little above the wall surface). Using a spackle knife takes a little practice-doing it right means very little sanding: again, leaving just a bit of filler above the surface. I could write a long paragraph here but just watch the video below.
Light-weight spackle does not sand to be very smooth, but dries so fast! You need the knife linked above or one plus your trusty 5-in-1. Ah, my baby.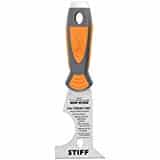
Sand if necessary. Careful here. What did you use as a patch? Lightweight spackle, still the best for all small patches, sands very poorly. Go slow and it will be ok. For deep holes, I’ll load it up with drywall mud (which shrinks in big cracks and will need multiple coats). When dry (a day or more depending on how thick), I fill any small grooves with lightweight spackle linked above.
Dust with a slightly damp cloth around your repair (not on the filler compound)…and…wait for it…
DON’T Prime! Ok if you have a big area (over a few square inches, yes you need a primer), but generally 3 coats of your wall paint is fine for small ones. To be sure it does not ‘flash’ (especially important for long walls like hallways), yes go with a primer. But we don’t like to clean 2 brushes (or one brush twice). If we have a brush living in a can of primer yes, we’ll use it…(don’t laugh, we don’t mind a gooey brush). For perfectionists: don’t do what I do! Prime with a clean brush. Then clean your brush quickly and go to the wall paint.
Paint 3 times (counting ‘primer’ coat). Most house paints do not take long to dry between coats (we use fans and even blow dryers if we have to watch paint dry). How to test if it’s dry for re-coating (you don’t want to touch it). When you do your wall, at the same time paint some scrap sample on the side but make sure the tester sample absorbs or does not absorb liquids in the same way as your wall. (Fancy pants word for this is porosity). See below about buying/mixing a color match.
If the result is not good enough for you—you will have to repaint the entire wall or room to get a uniform look to your touch up painting walls.
WHA? WHY? HOW? WHO?…The details of it all.
 We’ll keep what follows as short as possible, but if you want to get this over with, just go to the video, which just shows the ‘how to touch up paint’ but not as much detail as this post.
The mantra I give my customers (when touching up a painted wall) is:
I will see the difference, you will see the difference, but nobody else is ever going to see the difference. Wow, that was a long mantra.
Sometimes the touch-up painting wall paint is not a good match, we paint the entire wall, or yes, the entire room. You have to balance pickiness with your budget.
Finally, let’s consider the 4 key things you need to know to get it done right. If you don’t care about the result much, (talkin’ to you landlady and landlords, you know who you are!!), just jump to the videos at the bottom.
Gloss matching – not all shines are created equally
Do you know the exact level of gloss of the paint on the wall? This is a trick question. If you say Benjamin Moore eggshell: wrong! Benjamin Moore has several lines of paints (cost /quality differences). The Flat, Satin, Eggshell, Semi-gloss, Gloss of one line is not the same as the other lines. Some offer 5 grades of gloss, some leave out ‘satin’ and have only 3. You see now.
If you really care about getting a good match, do not try to use one company’s eggshell (for example) with another company’s eggshell. They will not match—not ever. I know how to touch up paint of all kinds, but I will always have a problem with gloss.
Don’t know? A paint store can help if you bring them a sample (samples must be large: see the video below). The more gloss in the paint, the harder it will be to match. Flats and Mattes… ah, easy street.
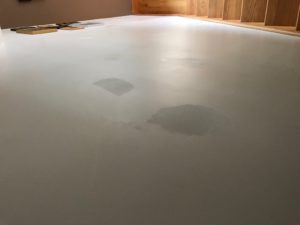
What causes flashing? The angle and type of light are key. Hallways with the long, low angles show bad touch up painting walls.
- Also, the number of coats matters: more coats, more shiny-ness. Use this fact to add gloss (even with flat paints!) Try to keep paint off the original wall paint.
- Flat paints do flash least, but each coat makes your repair glossier (even flats and mattes).
- To make a good touch-up painting wall you need 2-3 coats: try to stay within the area of your patch and not get too much paint on your old paint (the gloss will build with each coat and you have the problem…you know… guess).
Two examples of flashing:

You’ll soon get the hang of how to touch up paint (esp. the glossier paints): Shine on you crazy diamond.

Texture matching – applicators gonna applicate
Texture eyesores happen because roller marks and brush marks create leave different paint patterns.
Each brush or roller leaves a unique texture. Use a work lightt to examine well. With paint, you can give the repair a little texture to blend it with the surrounding wall (that was probably rolled and has roller texture).
But you don’t want to clean up a roller just for this…so FAKE it. (Actually, I explained how easy it is to clean a roller and also the lazy way to clean brushes).
- Coats add up. Remember that some texture will come about from every coat of whatever primer/paint that you apply.
- A “dry roller” can be useful here. As your paint dries, just before it is tacky, go over it with a roller that is not soaking wet (you can squeegee it dry with your 5-in-1 or even a stir stick). This way leaves a lot of texture.
- Avoid “lap marks”, where the roller builds us sheen where it overlaps. Feather your new paint onto the old paint to hide the boundary ( and lap marks).
- A list of applicator types: You can try different applicators such as foam etc. 1) Disposable brushes 2) Painting pads (pros never use these they are too slow) 3) Brush/roller kit (most are awful, but this one has a good brush and roller), 4) Don’t forget what you learned in kindergarten: fingerpainting practics all pays off now! You can touch up small spots with your finger. Why not?
Do we have to wet and then clean a brush or roller? No. Lazy? Me too. It’s probably too much to wet a roller just for a few wall touch-ups. So what? Well, you can fake it by dabbing the side of the brush bristles or even the tips. Experiment first!
Color matching – welcome to the future…OLD BOYS!
Trying to match paint at home is very, very difficult. I have had some success but not much. When it comes to adding a bit of that and some of this, let me warn you: pay the pros at the store and save your time. You have your hot date tonight!
Old Paint. I wrote an entire article about this, but here is the skinny: do you think you have the matching can from the last time? How long did you say it’s been out the garage? O, boy. Don’t open it yet. Don’t shake it. Have a lady’s stocking or paint strainer ready, carefully open can and pour what you can thru the strainer into a clean bucket. Old paint with dried junk becomes just like new.
- What you see is not what you get: all paint dries darker. We use a blow dryer to speed the color testing process.
- All paint fades. Even THE SAME old can of paint may not match. Why? Light and time simply fades paint. The sun is the worst. Do you know the one place where the sun never shines? The old paint can!
- Storing your touch-up paint: Small quantities of touch up paint are best stored in small cans/bottles (there is less air to dry out your paint in a smaller container). I tell my customers to use a glass jar (because over a long time many plastics will allow the moisture out), and even store it in the fridge! It’s great on waffles too!
Buying new paint.
Match-making. Is there an app for that? Duh. Beware, these apps (below) will not be exact! Oh, you’re just fixing up to rent? Go ahead!
- Benjamin Moore Color Capture: iPhone – Android
- ColorSnap Visualizer from Sherwin-Williams: iPhone – Android

How to take a sample to the pros. The paint store will place a small sample of your wall sample and use a blow dryer. (Watch the video to see how to get the kind of sample they need.) If you give them some new paint from the old can, you’ll get that. You want the faded color it is NOW, and that means taking a sample.
There are 2 ways to go:
Eyeball matching: if you will just ask the store for something “close enough”, just take them a small bit of your wall from under an electrical plate: this way there is not another hole to patch!
Computer matching: These days modern stores have a computerized spectrometer that identifies the color that is closest to a color that the company makes. You must have at least an inch square. More is better. Yes, you’ll have another hole to patch from your sample!
In other words, if Sherwin Williams makes Boring-Day-Gray and you take a sample to a Benjamin Moore store the BM store’s computer, it will spit out a gray, but not Boring SW’s gray. But it’ll be very close. Is it good enough? Probably. That depends on you. The sheen will be different too (even if both say “semi-gloss” or whatever).
You’re done, now: Quality Check
Success? Sure? Check for flashing at a low angle in all kinds of light including nighttime: if it flashes flatter, you can add another coat and/or paint a larger area to help it to hide the repair. Not so happy? Just tell friends that your dog did the touch-up painting wall work.
Perfectionists Unite!
- First, don’t do what I do! Prime with a clean brush. Then clean your brush quickly and go to the wall paint.
- Paint the entire room, or at least the wall. That’s expensive and too much for those cheap, sloppy bums up above in this post…HEY!, I resemble that! I know, it may bug you, but try to think big: there are more important things in life than a spot of slightly shiny paint!
- Check your work at all hours of the day as the shadows move: look, glancing at all angles. Some light shows more imperfections (check at night too).
So you have a few wall touch-ups: it shows character. It shows you know how to touch up paint. These are not the droids you’re looking for! You do not need to know how to touch up paint perfectly!
Above is everything you need to know about how to touch up a painting wall, but please remember, it almost never comes out perfectly. My advice is to hire an older painter (Yes I’m an age-ist). No, you cannot hire not me, I just type now). Find a pro and get her or his experience and tell them you hate flashing! And ask if they have read Brad’s post on how to touch up paint!
Thanks for reading.
Proof that nobody notices much:
In high school, I had a favorite ex-hippie teacher who liked to go off task and discuss Janis and Jimi. One day I noticed that one of the lenses in her glasses was rose-tinted and the other was clear. I told her that after class and she grabbed me and… no, wait that was my DREAM…. after class, she was amazed to see that only one lens was indeed tinted! Now in her eyes, I was SOMEbody! No. I was never anybody’s somebody. Sniff sniff. If you are reading this Mrs. Tackney, now you know how to touch up paint!
To avoid flashing, could one use satin sheen on top of semi-gloss?
It all depends on the paint sheen you are trying to match. I’ve spent loads of time mixing flat to satin, semi to this and that… it’s very hard to match. The problem is that even within one paint company, an eggshell for example from one line of paint…each line of paint is of a different price range and quality… will not match an eggshell in another line. For example, in Ben Moore, the “Ben” line may offer flat, eggshell, semigloss and gloss. The Regal line may only offer flat, eggshell and semigloss. So the Regal will be in between whereas the “Ben” will be flatter. I made those up… not sure which line offers which, but you get the idea.
So, the answer is that you should find the right semi-gloss to go over your old semigloss. I’m assuming you are touching up. If painting the whole wall, it does not matter: use any paint, but it may take 2 coats if you change sheen. Good luck,
b
We’re painting using Benjamin Moore flat, and on the second coat, bubbles appeared in some spots. Some were spackled areas, but most were not. Any ideas why that would happen? Do I just pop them, remove excess paint, spackle, and repaint? Never saw anything like this.
I’ve seen this and the only explanation I ever got was moisture in the walls from the paint taking time to get out
Just wait and see if it relaxes and then live with it…
or
yes, scrape off, let dry well, spackle, sand primer paint twice.