
If you’re painting brand new dry-wall, we have a post just for that.
Preparing Walls for Painting: Prepping Old Walls
Are Walls in good condition? Keep reading.
Problems? See the next section, but in both cases, you want your walls gently sanded and cleaned.
Many walls we work on were painted by DIY-ers who used cheap rollers that shed lint into the paint, leaving a gritty surface. We give that a sanding (mostly from eye-level down to knee-level), and then wipe with a damp cloth. Most walls have pin/nail holes and we write about that in #4 below, but generally, you can start to paint most pre-painted walls with little prep. The other DIY sites will not say this to cover their butts, but it’s true. Let’s not lose sight of the forest.
When do you need to prime?
When you are going to paint new walls, red walls or old yeller, uh, I mean yellow, or unless you are changing TO NEW red or yellow—you need a primer. Somehow the chemistry (pigments) in red and yellow paints are problems. When you buy your primer for red paint: have it tinted gray. Primer for yellow: no tinting. Ask advice from the store. Read my post on paint-and-primer-in-one and when not to use it.
Other than that, you only need a primer coat when changing from a very dark surface to a much lighter one. The better lines of paint have no problem covering in 2 coats. Don’t believe the ads you have seen about how our great paint covers in one coat. Bunk.
Problems are not problems
“Problems” are not really difficult (except the last one in the list – oh boy.)
Problem #1: Water Stains. (Read this and #2) If you had a plumbing or roof leak (now repaired right?), you have to put a stain-blocking primer on the water damage. such stains bleed through every single coat of paint you could apply. Amazon sells Kilz and so do most paint stores. Other products are called Bin, and so on. Use the knowledge of paint store managers, or talk to me here, and I’ll reply asap.
Problem #2: Water Damage. Sometimes water will ruin the ‘rock’ of your wallboard. It will turn soft and powdery. No worries. It’s messy, but it’s not rocket science. Just dig out the soft rock, and fill the hole with a pre-mixed drywall compound (“mud”). (It lasts forever in a plastic tub if you keep the lid clean and tight). This stuff shrinks so we only use it when we have to. For deep holes, you’ll need several coats of mud. Sand between coats somewhat and sand well after the last coat. Use the rough grit sandpaper (about 80 grit) to go fast and fine-tune with 150 or so. I’d recommend an assortment pack. For massive holes, sell the house. Not an option? It’s ok, you just need to do a patch. See the next ‘problem’.
Problem #3: You will need some drywall “joint” tape and the compound mentioned in this paragraph, as well as a wide knife. A low-cost set of knives is here.
Cut a scrap piece of drywall in something close to a square that’s just bigger than the hole. With a pencil (never ink) trace your new patch over the old hole. Cut the pencil line with a sharp knife and remove the old wall. If there is a stud, you can use it to screw in your new piece, but if not just find a strip of wood (a painting stir stick will work, but something bigger is better), and fasten it to the backside of the hole as you see in the photo (this is simulating a stud and will give you something to screw your new piece into). It is just a matter of holding the stick behind the wall as your screw goes through it: if you have a clamp or a teenager, that will help to hold it as you screw. 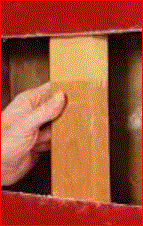 Fit your new piece in and screw it in and lightly cover edges with ‘mud’. Then lay your tape of patch material over that and then another coat of mud over the tape. If you don’t use tape, the seam will crack later. That will probably shrink and maybe crack a bit as it dries, so you’ll need at least one more coat, sanding between coats. Save the fine tune-sanding work for the final dry mud. Whew. Done. Prime and paint. All too much? See my first short story at the bottom of this page.

Problem #4: nail pops. The nails or screws that hold the ‘rock’ up to the walls frequently crack and pop out (mostly from temperature changes outside, not from ‘house settling’). Slamming a door will pop them too: vibrations from that loud music you play. Not really. Just scrape the loose stuff out with your putty knife (or 5-in-1) and hit it with this spackle. We use non-shrink, lightweight spackle because it dries in only hours, or less depending on the depth of the hole. (“Mud” takes overnight). Your wide knife from the above will work but a medium-size knife is what we use, or if nothing is around I’ll just use my 5-in-1. Apply, let dry, give a quicksand, prime with regular wall paint (not proper! but ok) if you have no primer handy, and you are done.
Problem #5: pin and nail holes. We don’t do much here, just like finger-painting in kindergarten, we just our finger, spread a bit of lightweight spackle (described above) and wipe with the palm of the hand. No need to prime.
Problem #6: glue type gunk. We just remove with a knife and use a little paint thinner on a rag. If you have a real problem, write to me.
Problem #7: paint beads up like water on a waxed car.

Ok, you have a serious problem. It is probably grease or even tar from a smoker. (See not so funny cavitation story below* ) This beading is known as cavitation. The paint cannot adhere. You are going to have to get your hands dirty, but as they say, if there is no solution, don’t worry. If there is a solution, don’t worry. Here the solution is a solution. Tri-Sodium Phosphate (TSP) is your new best friend. It comes as a liquid or as a powder you mix with water. It’s not very toxic, but WEAR EYE PROTECTION and water-proof gloves. It is basically soap plus Moxy. Really, the phosphates are just something they used to put in detergent, but it was having a bad effect on the environment. If you have any mildew or mold, don’t go with bleach: Bleach can actually make the mold spores retreat deeper into the surface. Try BioBarrier.
Short Story on Preparing Walls for Painting
That’s it but here is a short story: My father showed me how to just stuff a hole in a wall with newspaper until the paper was fairly tight, just keep pushing in the paper until there is no more room in the hole. With the paper just below the surface of the wall, he would layer the mud in coat by coat. It’s easy but slow. Works!
*A short story about cavitation: We were assigned a studio apartment in an urban setting (near NYC). We had done literally hundreds of these: 2 per day. This one was very different. Brown walls need 2 coats of off-white. Let’s go in. The stink, oh god the stink. Anyway, let’s start painting. Oh, the cavitation, the cavitation. We packed up and left. The cause? Smoker. 20 years in that hole. The brown walls? They used to be white. That what’s happen sometimes when you are preparing walls for painting.
If you have any comments or questions about preparing walls for painting, please write in the comment section. I’ll reply asap!
Hey Brad…you’ve been extremely helpful in helping us w/our painting projects. Very much appreciated😊 Have another question. My husband painted over some window trim using Advance. At this point, I have no idea what kind of paint he painted over??? Latex?? Oil??? I was not at home when he painted the trim (while the cat’s away, the mice will play!) What I can tell you is nothing was prepped…no sanding, no wiping down with toxic solution, nothing. The adhesion is not good. Flaking off. My question…what do I do now to fix the problem??? If I had to make a bet as to what kind of paint is underneath, I’m going to say semi-gloss latex. We think we have the same paint on another window. Appears to be the same color/sheen. I tested the paint on the other window. Color on cotton ball! But semi-gloss.
Should I sand everything slightly, prime, & go over with Advance?? If so, what primer??
Should Advance adhere to oil base paint w/out sanding?? (In the event the original paint was oil base??) It’s not so maybe I’ve answered that question???
Looking forward to your advice how to fix the paint that is not adhering so great???
Kim Rimmer
Bonding is always an issue. Sanding or deglossing old oil paint is important. If it’s flaking, what is under is oil. IF latex it would not flake, it would have bonded (unless very dirty, oily etc)
There is a painful sentence ahead. Fasten seatbelts and put your tray in the upright position.
You need to sand it all off and start over. You need to go down into the old paint too, not just the new stuff.
If it were me, I’d probably buy a toxic paint stripper and take it down to wood.
The budget way to go is to just sand what’s flaking, and paint and do this every so often until you get all that flakes off.
Tell your husband to read my site!!
good luck
b
Thanks for your super helpful information. I am going to paint a hallway in a 50s house with tons of trim around three hall closets and four bedroom doors and also all the baseboards look like crap. The paint on the trim is quite glossy. How to make sure that the new paint adheres without peeling off? I’ve used a primer called Stix before elsewhere in this house for this problem and it works well but is very expensive and will add a lot of time to the project. Thank you!
De-gloss is your key word. Stix is great, but alone … well, I would not skip the sanding or de-glossing.
Read this on de-glossing.
As to the cost, yes, but think of it this way: what is your time worth if you have to re-do it and not just re-do but to remove all the paint that’s peeling and re-paint. That takes the T out of pain… Ha ha. Spend A LOT. Saves time in the long run.
I would sand every bit of trim, or use a liquid de-glosser (a respirator is a must in that case) then Stix or another bonding primer then 2 coats of paint. Use a 9-inch roller as I’ve written about on this site with a brush to even out the roller. Do the trim first, then mask the dry trim and do the walls. That’s what pros do. Then later just touch up where you hit the trim. Hope this helps.
Hello, thanks for the great website. I just bought a house. In a room that the previous owners used as a child’s bedroom, floating shelves were attached to the wall with sticky adhesive squares. When we pulled them off in order to repaint the entire room (for a color change), paint peeled off in very large pieces. The edges of those areas are still peeling/separating from the wall. I tried to sand the edges down like to get it to stop, but it doesn’t work. What can I do to get it to stop without peeling off the entire room’s top paint layer? How do I fill in the large sections left behind so the missing layer isn’t obvious once the whole room is repainted?
Well other than peeling it all off, you can spackle, sand the patch, prime and paint. If the paint is wanting to fall off, it’s best to peel it all off, spackle, sand and paint.
If the paint is somewhat adhering, spackle patches as above.
See this post for materials needed…at bottom under prep.
First time DIYer and just bought a home built in 1966, and we are prepping to paint. We ripped off wood paneling and found drywall underneath (nailed in, so are just filling the holes). The drywall seems to be coated with almost a plastic-y material. Have you ever encountered this type of drywall? Will sanding the surface smooth be enough before priming?
Hi, sorry for the delay. I don’t know what you mean by plasic like… It’s probably just old, and I think that yes, sand, prime, and paint will be fine. The way to do this is to buy your materials, perhaps a primer with bonding power like Stix and so on, then TEST in a spot or three. See how it looks and scratch with your nail to see that it’s bonding. If ok, you do the whole room/house. Hope that helps.
Retired new diy-er. First try at painting walls. Bathroom with tile floor and wall tiles chest high. (have done some doors and furniture successfully). Stripped wallpaper. Dif to remove glue. Sanded. Grouted a few spots. Used Simple Green to clean. Mistake #1 used non- paintable silicone. It looked good so I did the whole bathroom. Primed about 1/4 cutting in which was how I discovered the caulk issue. Spent a day removing the caulk and that’s when I discovered Mistake 2. did not know that the Simple Green needed rinsing off. The primer (got from paint store) was coming right off with water and washcloth as I was removing caulk. Bought tsp and am washing the walls and removing the primer.
Do I need to remove all the primer? Is there anything else I need to know before I mess up more? The walls are plaster, not drywall. Thanks.
To remedy the silicon ..I assume you mean caulk…it’s easy, well, you’ll be the judge of that!
Just take paintable caulk and caulk over the slick stuff, let dry, paint.
If it’s a big area, try the shellac-based, not the water-based, BIN. It’s nasty but will stick
I would also try STIX from ben moore right on the silicone.
For the primer not sticking, I’d not strip it…wow, what a headache that must be. Too late to stop?
Try primers above to see if they stick. I think they will, then you just paint.
I never heard simple green needs washing off…thanks, I’ll test it.
Let me know what works?
B
PS if you can remove the old primer I think it’s possible the problem. Primers should STICK !
Thank you
I am using your tip from you tube on “How to use a shop vac to catch drywall dust”. I just had to stop sanding to let you know how awesome this tip is! The idea of all the fine dust flying around was literally a roadblock to continuing my project and now I hardly have to deal with any!
Hi. I have never painted my walls (20 years) and there were many imperfections which have now been fixed with mud and sanding. The walls are white now and I’m planning on painting them a colour. Do I need to prime first?
Thanks
Hi. You are doing everything right. Now, all you need to do it prime. No expensive primers are needed unless you have water stains or mold stains etc. Just this drywall primer, what we use.
Good luck!
Thanks for your quick response! Sorry to ask question twice. Feel free to delete both these.
Thank you for all this information!
Question: the walls I will be painting have many anchor holes. Many are 5/8″ in diameter. Is the lightweight spackle you mention the correct product to use for these?
Thank you in advance.
Hi. I love you! Thank you so much for all your information and the work that went into it. I wish I had found you at the very beginning of my project. It would have saved me much time and attempts at making decisions. Fortunately I haven’t purchased anything yet.
Question regarding filling of holes.
The walls I will be painting have a massive amount of anchor holes and much of them are 3/8″ diameter after removal. Since I will be hanging artwork eventually I am concerned about what filler product I should use for strength in case I end up wanting to hang something in the same area. What product would you suggest?
Hi. Thanks for the nice words… What I would do is either use a ball-peen hammer to knock the anchors just under the surface, then fill the hole or pull it and fill the larger hole. It would not matter so much if you want to put a screw or nail right in the spot where there is a plastic or metal anchor: the shaft would just go to one side. I would say you’re safe 999 times out of 1000.
For the best look later, use drywall compound, ie mud. It sands smoother and harder than the 2nd choice, lightweight quick-dry spackle.
I’ll get to your other question on that post re. trim.
Thanks again.
thanks for the information
no, I’m good thanks. since im not pro, i had primed an apt and after a visual inspection i had just thought that it looked like it would have benefitted from another coat of primer. obviously, an amateur mistake. thanks fr taking the time out to answer my question.
have you needed to prime a wall more than once? thanks.
Hi. If you use the right primer for the situation, no. If you use a product that does not have the stain-blocking ability for the stains you have, yes you will have to use more primer, and better primer. If you like, write again here and let me know what you have…if you like, send a photo and description. Good luck.