Whether you are painting wood trim that real wood or a budget material called MDF etc, or anything else, painting trim inside your home is very straight-forward, and the tricks … oh, the tricks.
Here are the 3 basic steps, then we expand them all below.
- The tool arsenal: not what you might expect
- The method for painting trim like us pros
- Clean up: we show how easy it really can be
 If you already have experience and just want to know what we use:
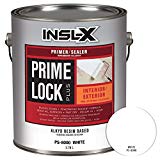
Primer: For stained/varnished wood or unpainted wood, we don’t want to go back and find stains bleeding through our weak primers. After sanding, we use the very best wood primer, Prime Lock Plus, as it blocks all stains (including wood knots that may take a year to bleed through) and creates the bonding that keeps the paint from flaking off. Read more about primer to block stains in our post.
Paint: After the prep on the trim is done, we use either of 2 paints.
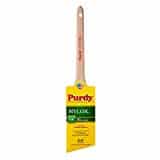
First, the very best in trim paint, Benjamin Moore’s Advance.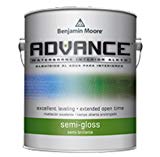 Advance which is water-based, but behaves and looks just like oil-based paints always did.
However most customers want to spend a little less and Regal Semi-Gloss, also from Ben Moore costs about half as much as Advance, looks good, holds its color ‘forever’, and can be scrubbed clean. It’s a little faster to apply than Advance: it’s my high-quality money-saving choice. I’ve applied hundreds and hundreds of gallons of Regal in my 40 years of painting.
Here we go with how to paint trim: I gathered all the tools/supplies you will need on one tools page.
Read details about high-quality paint for trim here.
Jump to your section:
- Looking for exterior trim info? Jump to this section.
- Are you also painting the walls? First, read the main section just below about painting trim, then there is a section on a very big time-saving tip for you.
- Are you painting stained/varnished wood trim? We explained it all in a separate post: please read about painting stained trim after you read the section below on painting wood trim in general.
Painting wood trim as fast as a pro:
People are shocked at how fast we go: well, the truth is, it’s magic…NOT.
There are 2 big tips coming up, but here is the main thing: we use a roller cover (that does not shed lint) and a good brush (that doesn’t shed bristles).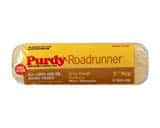
Ever see paint on walls with tiny little hairs? That is from the budget rollers that come in a kit—you’ve seen them…with the tray, all wrapped in plastic.
There are more tools to know about in #1 below. I only recommend ones that are reasonably priced and that get you through many jobs efficiently. I buy these very same tools and keep them for a long time.
1. The tool set-up makes all the difference:
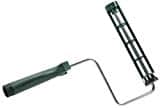 A basic professional trim painting set-up consists of a roller and brush, a bucket and a screen (grid). We don’t use pans/trays for rollers—ever! Pans spill and you can step in them—delightful. This roller frame, a.k.a. ‘cage’ can accept most broomsticks, but for now and forever grab the telescoping pole that can snap in and out of this same roller.
All these are gathered these tools and more (like plastic, tape, drop cloths, etc) — on the painting tools page. You will like that they are not that expensive and will last a homeowner a lifetime. We have links below on how to easily and quickly clean them.
Why a roller? As you will see below in my short video, we get 100% of the needed paint from the bucket to the workpiece with the roller and then just tip it out with a quality brush. This also explains the 
At the very least you will need: sandpaper, drop cloths, a good light, and more. A fan helps, and keep your spackle handy. Of course knee pads: I would never paint trim or even doing house cleaning, without them. It’s all on that page.
If you buy the ‘dollar-store-type’ roller cover and brush, you’ll wish you didn’t: the roller covers will shed lint and the brushes loose bristles. Ours never do.
2. The method: This is at least 3x faster than you go now
- Before you paint, prep is key: jump to the prep info below for painting wood trim or painting trim in any condition.
- If the surface of the trim is greasy/oily like handprints around doorknobs, etc, you can just wipe with a damp cloth to remove the dust and then paint. Often you must sand down some spots like dust in the old paint. If you do, that dust from the sanding should be wiped off. Otherwise, get painting. Often we do not do any other prep if the surface is clean.
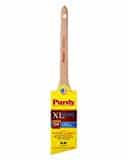
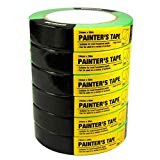 Masking? We pros only use masking tape in tight corners because Purdy brushes can be controlled so well, but you should still feel free to mask. The green painter’s tape has special glue: when the tape is removed, this glue will not pull off even fresh paint. The old type of tan masking tape can pull off even old cured paint.
- Here is the biggest tip I can give anyone—don’t brush trim paint! Roll out a section of your workpiece with a normal short-nap roller cover (seen above) you might also use for walls. We prefer the wool/poly blend: wool absorbs and poly gives long life.
- With the rolled, still wet paint on the trim, just use the tip of the brush to smooth out the rolled paint. This removes the ‘nap marks’ and with the paint on the brush, without dipping, do what you cannot touch with the roller.
- With Benjamin Moore’s Advance paint, you can just roll. No brush needed except where the roller cannot reach.
- That’s it. Easy cleanup info is just below.
Not only is this method far faster than just brushing, but because it goes so fast, you don’t see ‘lap marks’ where the new wetter section overlaps the last now drying section. When brushing you are going slower and you see more overlap marks. When dry, these lap marks can be seen: not the method for painting wood trim.
Picking your finish trim paint:
With Benjamin Moore’s Advance, or the now ‘old-fashioned’ oil-based paints, you don’t need to ‘tip-out’ the brush marks. Latex, however, dries much faster and the roller and brush marks will always be visible. Do your best to make it flat.
If you want to use the traditional latex paint, like our 2nd fav Regal Semi-Gloss, also from Ben Moore. If you want to minimize brushstrokes, add Floetrol to your water-based paint: it ‘flows’ and increases the drying time. This gives the brushmarks a chance to even out more. Great invention.
If you are painting the walls as well as the trim
Paint the trim first. There someone finally said it. This is fully explained in our post about painting the trim first, but the key point is that cutting the line between trim and wall is MUCH easier when the last cut is on the wall, not the trim.
The steps:
- Paint the trim and don’t worry about getting trim paint on the soon-to-be-painted wall.
- Then paint the wall and don’t be afraid to get a little wall paint on your new trim.
- Then if needed, go back and touch up trim. Easy and fast.
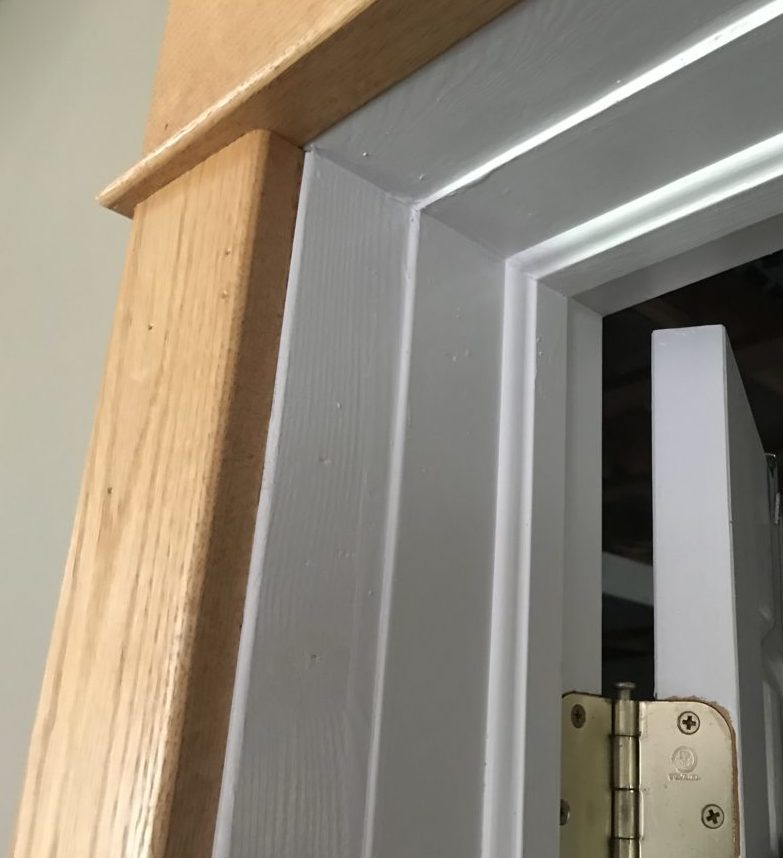
The basics of prep for painting wood trim:
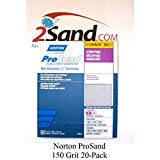 Pre-painted trim needs a quick sanding with 150 grit sandpaper and a wipe down with a damp cloth (and allowed to dry). You are ready to paint. A shortcut here is using a toxic but effective de-glosser, but it’s very toxic. Gives the same effect as sanding, but no dust. Please, please, please open the windows even in the winter, and wear a respirator. A respiratory is handy in many situations. I simplified the complex world of respirators and filters.
- Starting out with stained/varnished wood trim? We explained that case in our post about painting stained trim: it’s not what you would call simple, but anyone can do it.
- Untreated wood of any type, the best primer is Prime Lock Plus by Benjamin Moore. It’s oil-based so buy an oil-compatible brush: the Purdy XL Elite can be used with latex as well, but we find that once it touches oil, it’s never like new again. Oil paint is one time we buy throw-away brushes. If you want, clean your brush with mineral spirits, however… We just don’t: it’s not worth the brush you get to keep.
- For faux wood or MDF etc, that has never been coated, use the same primer above, Prime Lock Plus. Especially for MDF, this primer will not raise the soft grain more than the hard which creates the bumpy look. Also, it totally blocks wood knots and other stains. These stains can take a year to bleed through into your top-coats.
For painting wood trim outside the home
You will be using some different products, but the basic method of the roller/brush combo above is exactly the same. What’s the best paint for house trim? Most of our customers like low-luster or satin on a house body and semi-gloss on the trim.
3. Clean up: it’s really not that messy and goes quick.
Here is the basic quick way to clean a roller and a brush, but we have a full post showing how easy it is to clean roller covers and one just for cleaning brushes. Bingo.
For rollers covers, there are two ways: easy and fast. This is for quality roller covers as mentioned above.
The easy way is to fill a large bucket with water (latex paints, obviously) and set the cover on its end overnight. 90% of the paint will fall to the bottom of the bucket.
Either repeat again for some hours, maybe overnight, or just squeeze with your hands or even better with the curve in your multi-tool or brush comb.
The fast way is to use a spinner. Slide the cover on the end, dunk in water, and hold in an empty (large) bucket. Pump the piston and the roller spins dry. Repeat. It’s quick.
Watch me do it. (YouTube)
For quality brushes, after you wire brush off any dried paint from the heel of the brush. just submerge in water or solvent and pound the bristles about 20 times. Change your solvent and repeat. With a good brush like Purdy, you only need to get about 95% of the paint out. More is better, as dried paint will slowly turn it into a club. Before allowing to dry, comb with even a regular hair comb so the bristles are good to go next time. If you don’t have the cover, wrap with paper and tape.
Watch me do it. (YouTube)
Tip: we also put hair conditioner from the shower as a final rinse every few cleanings. This replaces what the bristles lose. Be sure to rinse it well.

That’s our method of painting wood trim (really painting trim of any type) and painting wood trim or any material. So many people have asked us how to paint trim and how to paint baseboards with carpet (just use cardboard as a shield). Painting trim could be done with just a brush, but there is not a difference when you use a roller and a brush.
Let us know your thoughts and how you paint trim in the comments below.
Related posts:
- Pick your primer in our post on when you need a stain blocking primer: it’s the essential step before painting trim
- Pick the best paint for trim and for your cabinets or trim
- If you are converting from the wood look to paint, read the essential extra steps you must take to not have a disaster while painting your trims.
Here is a professional painter’s set up for painting trim:
Oh wow I was fortunate enough to find your website. Thank you for your trove of knowledge and guidance. 🤘
Hi Brad,
Hit a road block over the weekend with my trim painting—back with another question.
In some areas, the old paint scratches off very easily to reveal the even older paint. It’s like a scratch ticket. I read a previous comment about adhesion issues, and you unfortunately suggested sanding it all away. Will TSP do anything? Desperately trying to avoid sanding
Thanks for your help
If the paint is tight, you can degloss with a liquid deglosser and that is the same as sanding essentially. If the paint is loose, take it all off…sorry. TSP will help bonding yes. Key point: a high bonding primer
Hi Brad,
Thanks for all your resources. I’ve been putting off painting all my interior trim, but you’re giving me confidence that it’s not rocket science.
I was giving the [nasty] trim a nice cleaning and noticed places where the old paint was bubbling off and other places where the old paint had already chipped off. I’m guessing I should go ahead and scrape off the paint that’s no longer sticking to the trim, is that a good guess? And would you recommend using some sort of wood filler to smooth it out after? I’m trying to avoid getting large contoured areas, if that makes sense
You are going well. Scrape with a sharp scraper (learn on this site how to file a scraper) and when the loose stuff is done coming off, sand well with heavy then light sandpaper, then yes a nice wood filler but it’s very difficult to sand. I like hard-drying interior spackle…called vinyl spackle I think. Forget what it’s called but it can take a beating. Diff from what you use on walls. Easy to sand.
Take your time, put some music on. Try to enjoy and not rush. Give more time to what is at eye level.
b
Amazing–thank you. The kid at the Sherwin Williams store told me just to paint right over it, but I’m not sure he quite understood my question. So glad I found your website, thank you for such a quick reply!
HI Brad, I had written about using the roller for baseboards… then I finished reading all of your pages, and I see that you did address that. Looking forward to putting all of your advice to good use!
Just be careful with the roller: you don’t go fast like with walls and ceilings…You just cover evenely then tip out with brush. Yes you may need some wall t.u. and of course protect the floors!
Hi Brad, great site, answering so many questions. I’ve been a weekend warrior for many years, getting better, sometimes! I have a questions about rolling the trim… how do you use a regular 9-inch roller to do it? Wouldn’t the paint get on the wall or the floor? I’m pretty careful, but I think I’m missing an obvious step somehow. Love your advice regarding quality paint and brushes; at least that I’ve been adhering to for quite a while. Also, I imagine painting trim first also includes painting window trim as well as baseboards and doorways. thanks very much!
See my reply to your next message: I put it all in one.
Hi Brad,
I am about to paint the wood trim and doors throughout my entire house. Is there any escaping the high VOCs in primer? Should I expect high VOCs from Prime Lock? Want to avoid it as much as possible but also not sacrifice quality.
Thanks!
Well, yes and no. You cannot remove VOCs…evaporation does that, but you can 100% protect yourself. I agree that the quality of the primer is not worth any sacrifice so I just wear a respirator.
The ones on this page filter everything dangerous as far as we know. They may not be like a bubble boy, but I trust them.
Also, ventilate as it dries and keep air moving for the curing time which is a month or so in the summer.
Brad, thank you for all your work and your website. So much helpful information! We are fully replacing all trim and baseboards and installing new pre-hung doors. The doors will be solid core pre-primed Masonite. Baseboards/trim will either be pre-primed MDF or pre-primed pine. I am reading that the primer they use isn’t actually primer and the trim/door will soak up all the water in the paint if you don’t prime first. In this case, would you still recommend Prime Lock and then Advance?
Yes indeed, the factory primer is not worth very much and in many, or most cases, will absorb your first coat so if you don’t re-prime it, you’ll have a non-continuous-looking topcoat (blotchy). But you don’t need very expensive primer: you just need to let the wood and factory primer absorb what it will, then apply two coats of finish paint.
Again, read about my method of rolling trim (roll on and tip out) to make it go fast. If the trim is not yet installed, even better. Spray if you have a sprayer or lay on sawhorses, roll and then brush.
Read also about my fav trim paint which is water-based but levels out like oil. It’s for advanced skilled painters only, but it is the top paint for trim today: Ben Moore’s Advance.
I haven’t really read anywhere on how to paint stained wood without any other coating over it.
The trim throughout the house has only been stained only & left alone.
So you are asking how to paint it? I’ll answer that but if I am wrong please ask again.
Bonding will not be much of an issue, but you want the best stain-blocking primer you can get…without too much mess.
If you use a water-based primer, like Kilz water-based, it’s possible the stain will bleed through in a year or more.
Or right away for that matter.
So use an oil-based stain blocker or if you dare, an alcohol-based stain-blocking primer which is the best on the market.
What I would do is use the oil then wait and watch and if any stains come through it would probably be only in spots.
Then I’d block them with the alcohol (shellac) based primer. Nothing comes thru that!
Good luck
Brad,
Just a few questions. If you use Advance on trim and doors would you be able to paint over it with regal select. If I use Advance now I am worried that in the future I would have to sand, prime and paint if this product was no longer available (just like oil) and I needed to use a latex paint. I am considering using the regal select on my trim and doors but am a little worried about durability. Presently trim and doors have Ben Moore oil paint from 18 years ago. It has held up but I don’t want to sand, prime and use regal if it won’t have the durability. Only my husband and I in our home. Wipe baseboards weekly so worried if the durability would be there.
Also
I think you have to sand, wipe and then you can use whatever paint you like, as if it was any other oil surface. You could use a nasty de-glosser too instead of sanding. I’ll write to BM support and if that is not right, I’ll come back here and update.
I am getting ready to paint baseboards and window trim that are currently stained. I’m going to paint them white. The baseboard is just standard baseboard – probably 3″ tall and then there is a piece of quarter round next to the hardwood floors. Would it be best to remove all of the trim, sand, prime, paint and then re-install or can this all be done with it in place? How detailed to do I need to be on the sanding – obviously there are curves and grooves in the baseboard and window trim – do I need to get into all of those crevices? And how do I protect my hardwood floors when sanding along the quarter round where it meets the floor? Seems that rolling a narrow baseboard like this will get a lot of paint on both the floor and the wall. What am I missing? Do you have a video of you actually rolling baseboard? Thanks
I would need to know if the old paint is oil or latex. I will assume latex, but mention oil.
If latex, just a quick sand of the main areas, removing ticks. Maybe fill old nail holes first with some spackle.
If oil, whether you will apply latex or oil next, yes, sand every sqaure inch well. Otherwise it will not bond. You can always use a liquid de-glosser but wear a chemical respirator and open all windows etc.
Remove the trim? NO WAY Jose’. Crazy amount of work.
Protect floor from sanding if you have an electric, but if by hand, just be careful. But protect from paint with tape and paper. See the 3M masker on my supplies page.
Rolling will be ok if you use paper and tape. Do it just as I describe: roll a couple of feet and tip out with a good brush. Key: buy good brush and roller as crappy ones shed.
Hope this helps.
B
Thanks for that info. All of the trim is actually stained wood so it probably has a coat of urethane on it -but it’s 30 years old so it’s all very scratched up. Again, an electric sander isn’t going to get into those curves even if they are slight. So, hand sanding every inch or deglossing is what needs to be done?
Also, do you have any tips on how to paint a brick fireplace that has already been painted? The previous owners painted the entire fireplace white, including the grout lines. I feel like it needs some character – depth. The brick is very smooth to begin with so the few holes and crevices already have paint in them and the more coats of paint, the more they get filled, creating a very smooth surface. Thoughts?
Yes, de-glossing. If you use a very good bonding primer, like Stix, the little out of the way areas that never will be touched by human hands or anything it will be ok because even tho it’s not bonded well, it has no reason to come off unless you scratch it somehow. But the areas you touch will not be as good. Ok, so to save you work if you want NOT to de-gloss, just sand well everywhere your hands and feet and grocery bags and anything could ever scrape, but only that. Then you use a good bonding primer and that’s all set. It’s not the right way to do it just so you know but will save many hours depending on the size of the job.
Brick. Ick. No, I have no tips on this really, sorry. Paint the grout and then each brick individually with a small brush? Hard to say. Strip it all off? Big mess.
Good luck
B
Good Day Brad,
I am prepping the trim in a bedroom for a new coat. I started sanding it with one of those sanding sponges. How detailed do I need to be with this? The trim has semi gloss latex paint on it currently. The new paint will also be latex semi gloss. I feel like I’ve read sanding is not even needed. ?? Thank you SO much for sharing!
I cannot tell what you are sanding. If some spackle or mud, a sponge is not the best. I only use it if I know I have to apply one or 2 more coats of mud. It does not leave a smooth surface but does cut thru the blobs of dry mud fast. So, finish with sandpaper, 80 then 120 or so.
If you are sanding paint, latex? no need really to do much sanding. Just knock off the ticks with any sanding method.
Did that answer it? Hope so.
B
Yes I am sanding paint, Latex. It’s the window trim, floor, door trim. Thanks for your guidance!
Thanks for the tips, Brad; I’m about to paint white trim adjacent to our wood floors and carpets. Do you typically tape off the floor trim adjacent to the floor prior to rolling?
I would not, but I have 40 years and a great Purdy brush. But my advice is yes, get some wide green ‘painters’ tape. That will take all your time getting it just under the baseboard etc. DOn’t use the old tan tape: the glue from it will stick to the floor in only hours and you’ll be scraping it off with paint thinner.
Good luck
b
Hello. I think I figured out that I can use your ceiling roller technique with the primer on that little lip?
I have partial day off from work tomorrow and will be picking up my first round of supplies : joint compound, caulk & gun, sandpaper. Stopping off at only Ben Moore dealer 40min away for some paint samples. Thanks again.
Hello. Another question. I will be painting crown molding currently painted white. It looks as though the last time walls were painted they painted the little lower lip that is perpendicular to the wall, the wall color, which is a gold color. I question whether that should be painted the wall color. It gives it an odd floating sense like it isn’t attached. Anyway, will the primer I am using (since the color is gold) work for that little lip too? Guess i might have to use a brush. ugg.
Thank you, again, in advance.
Thank you so much for putting all this information together!
Dumb question: should trim be washed with TSP first? Is TSP a de-glosser?
Thank you in advance.
Hi again. I’ll add this to the post above: I should have mentioned it I guess. Unless the trim is greasy/oily like handprints around doorknobs and light switches, etc, you just need to make it dust free and paint. You will likely sand down some old imperfections so that sanding dust needs to be wiped off. Otherwise, just paint. We often do no prep if the surface is clean already.