Plaster Walls are worth saving and painting

Plaster walls are harder to prep and paint than modern drywall, but it is great to save them, and it will probably cost you less in the end. Often plaster walls have a lot of lime so mold cannot grow in them. Plus…Character.
Right here at the top, you will be happy to see my top primers and paint. (For old plaster, I don’t recommend any paint-and-primer-in-one).
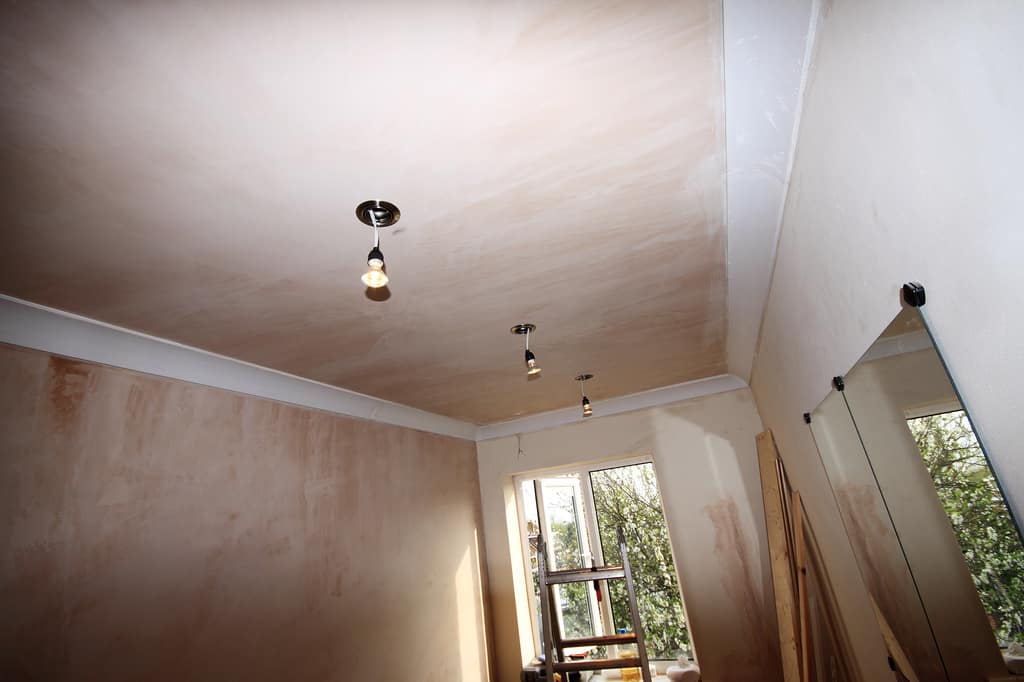
Water-stained walls? You need a stain-blocking primer. Here you see Zinsser’s Cover Stain. Tops. Some stains will still bleed through after some years, so you need to go nuclear. Just spot prime with shellac-based primer (nasty, nasty). Read about stain-blocking primer (scroll down to #3).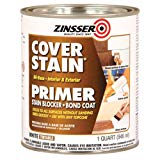
Painting plaster walls that are in good shape: prime any bare plaster (or drywall), with basic drywall primer. Comes in a one-gallon, or buy 5 gallons (shown) for the price of 4 singles.
 What paint? Pick whatever you like, but here is my best advice: don’t skimp. The best paints don’t fade, go on easier, and last longer than a well-advertised big box store brand.
There’s more below.
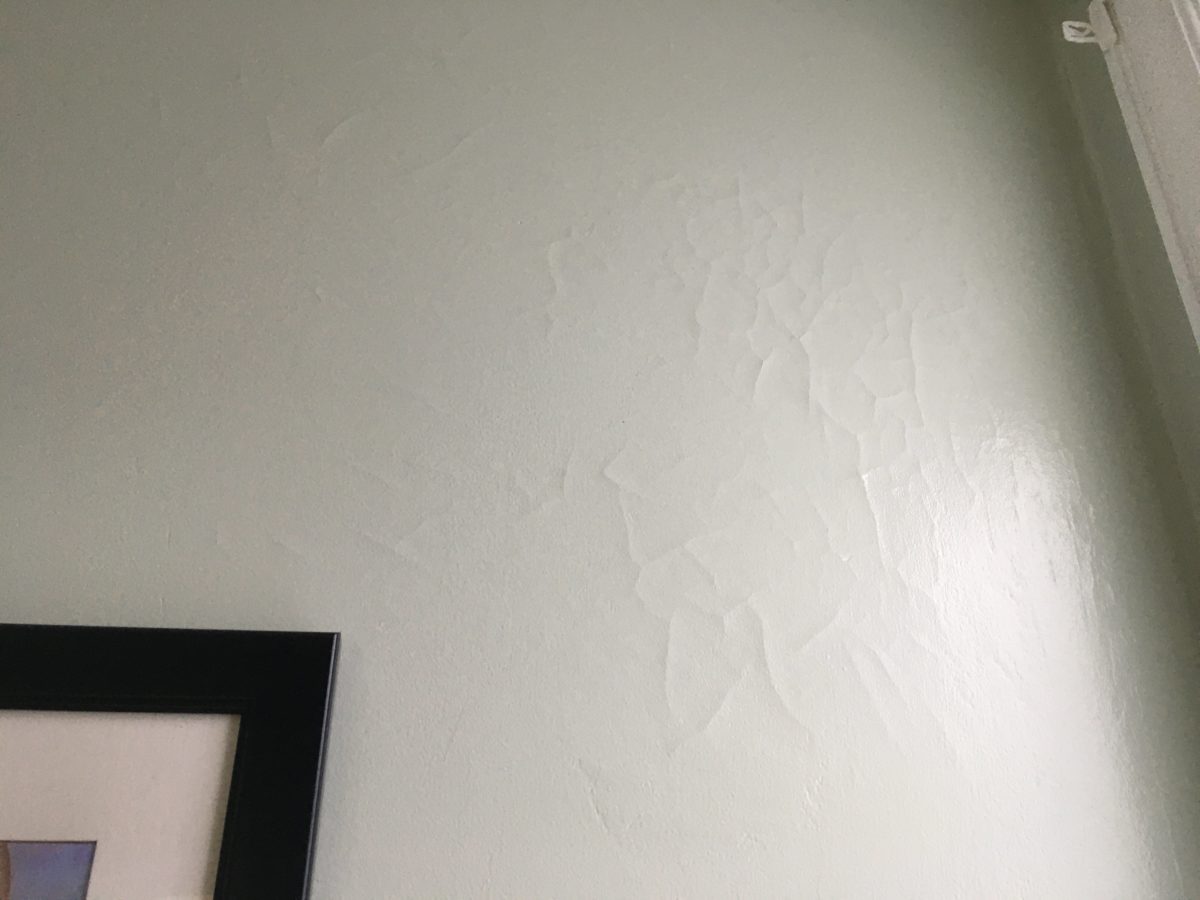
Plaster walls are usually cracked but are worth saving. If the plaster wall is still firm and has just separated from the backing “lath” which was usually cedar strips, you just need to re-attach with drywall screws. This will cause some cracking which you just patch up with spackle (sand all when dry). The products you need are all below.
Painting plaster walls in 5 steps
- Use a putty knife to remove any loose plaster. If you see a brown discoloration, that is probably a water stain from years of moisture and maybe leaks in the roof, etc. You’ll have to prime that with a stain-blocking primer such as Kilz Premium or a good product called 1-2-3. For mold, it’s the primer you see here, (comes in quart or gallon), but please read my post about mold-resistant paint.
- One trick is to fill tiny cracks with paintable caulk. It’s faster, and it stretches a little whereas other spackle and mud compounds will not. You have to assume those cracks will keep moving over years.
- Patch the hole with a pre-mixed drywall compound and give it a day or so to dry, and add a second or even 3rd coat if the dried patch keeps shrinking. Deep patches will shrink: no way around that.
- Large repairs will need tape and you can find how to do that in this post on preparing walls for paint.
- Sand with rough (100), then transition to, finer sandpaper (120) and then prime with drywall primer pictured above (only one coat is needed in most cases).
You should be ready to paint at that point.
Paint your walls with 2 coats of paint (in most cases):
Sometimes, if your primer is white and your wall/ceiling/trim/whatever is going to have white paint over that, you may be ok with one top-coat, but you have to cover every square inch with no skipping.
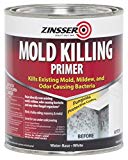
Worried about future mold? This fine mold-resistant paint is from Rust-Oleum (shown here). 
Make sure you have all the painting tools that you need.
If you are working with a lot of sanding, read our respirator mask guidelines.
How to paint plaster wall – summary
Painting plaster walls is almost like painting any other drywall. The primer that you use is the key. Don’t skimp: you need to use the best primer for plaster walls to seal the wall. If you don’t, top-coat paints won’t take to it evenly.
Important point: watch out for the toxins you are putting into the air that you and yours are breathing. My respirator link is just above. It’s for the zombie apocalypse also.
Key point: most water stains from plaster walls will bleed through every coat of latex painting work. Then you are laughing. After your top quality primer, you paint plaster walls just like any other interior paint job, which you will read about all over my site.
Write a comment below with any questions about how to paint plaster walls!
Great guide for a fresh look—painting plaster walls in 5 easy steps makes the process simple, ensuring a smooth, even finish that instantly brightens and revitalizes any room.
This is a wonderful post
Hello, I have a bathroom with a venetian plaster finish. It’s in good shape but its beige and I want to lighten it up and go for an off white paint. I don’t mind the texture, just want to change the color. It was never waxed. What kind of primer/paint would give the best finish?
I have to pass on this. I cannot give solid advice. Waxed? Never heard of this. If it’s like any other plaster, use basic drywall primer then 2 coats of your paint. Venetian means it contains marble dust. I have never coated that.
Nice Article…
We have a home built in 1943 with plaster walls. The walls looked great when we moved in. After sometime, the paint began to crack and peel. We have had the walls scraped, Kiltzed and repainted several times. After a period of time the same process begins again. We know know that the problem was covered up at the time of buying the home. Is there any product that can be used to stop this process? Thank you for any help.
I’d have to see it to really know, but it may be moisture in the plaster. It would mean ripping it out…sorry. Find a contractor who can test moisture and look at options. It seems from what you wrote that it’s very possible. Good luck.
B
Many plaster walls were originally coated with Calcimine paint, which is a powder mixed with a glue like liquid. This was done because paint did not adhere to uncured plaster, but Calcimine does. My 1950 plaster walls have this coating, and one room had a lot of peeling and has been scraped to bare plaster. However, it is mandatory to wash thoroughly the glue residue from the bare plaster, if you want good paint adhesion. Thoroughly, means a lot of scrubbing, or sand and wash. Next, it’s recommended to do a “Mist coat” of watered down emulsion matt paint without any vinyl ingredients; a paint that allows water up to 50% is suggested, is what I keep reading. Fresh plaster soaks up lots of water. A shellac seal coat may be appropriate and soak in deeper and provide moisture protection.
Thanks
Brad,
Apologies if this has already been answered. I am about to buy a house built in 1941 with a mix of drywall and plaster. All the walls (except for one in the kitchen that has some severe peeling) are painted well, but I intend to paint the entire interior of the house in different colors.
First question: Is there any prep work that needs to be done on the plaster walls vs the dry walls, or can we just spackle, sand, prime, and paint on all the walls, since the paint is in good shape and the walls aren’t damaged?
Second question: On the bit of plaster wall with peeling paint, how would one go about repairing and painting over that?
Thanks,
Daniel
You answered your first question correctly. Always do a test spot with your method and your materials and let dry and see how it bonds and looks.
2: I’d scrape and skim drywall compound or ‘mud’, sand, prime, 2 coats paint.
But I cannot see it so I’m only guessing, but sounds ok.
Good luck.
Man, thanks so much for the response this was very helpful. One follow-up question, what’s the best way to tell if it is Latex, oil, or enamel paint on the walls and trim? And depending on what paint is already there, do we need to get the same kind to ensure it doesn’t peel in the future?
If it’s oil, you must de-gloss or sand, yes absolutely. Latex over oil peels.
https://www.bradthepainter.com/testing-old-paint-is-it-oil-or-latex/
Hi Brad,
Thank you for ALL the wonderful advice. I have a question.
We had a mystery leak for over a year that we’ve finally solved. I scraped the peeling paint off. I also scraped this brown undercoat off (no idea what it could be). I’m about to wash it down and prime with the oil primer you recommended. Then I realized that perhaps I should wash it with a mold killer first, in case there are mold spores that I can’t see now. They may develop after the oil paint makes the surface unable to breathe. I’d hate to grow mold after finally fixing the leak. I see a little discoloration but I think that’s the water. I’m in Florida where the humidity is a thing.
So, should I wash with the mold killer?
Also, if I paint the wall on the side I can see can’t it breathe on the side that I can’t see?
Thanks. Julie
It would not hurt to wash with it yes, but I’d cut into the wall and see if mold is grown inside or on either side. Easy enough to patch a hole and worth it.
Yes mold can grow inside. Did you get rid of all the moisture? Sounds like you need to check that and then run a dehumidifier constantly… Mold is a serious health problem as you may know…more than most people know.
Good luck
b
Hi Brad! Thanks so much for this article. Thanks so much for this article. I have a couple questions. I have a couple questions. I am painting plaster moldings in a Courthouse, that’ve been painted before and are chipping and broken off in places.
Im required to use a primer that encapsulates lead before I begin painting. There’s no way I can remove all the old paint before priming, because the moldings are decorative. My first question is, will the primer adhere to the old paint, after cleaning the moldings with TSP? And my
Second question is will acrylic latex paint adhere to the lead encapsulating paint, with lasting results? Or is there a better type of paint I should use? I’m worried it might peel up from the primer.
So sorry this is confusing! Thanks for your help!
Firstly, wear your protective gear when doing any scraping and even primer encapsulation.
Yes, it should bond. You should do a test: a small area, let it dry and see if you can scratch it off. And if it’s up high, no real worries. Doors and windows however must bond very well, obviously. Why TSP? Not sure it’s needed here. Test with and without?
Yes, any paint will bond to the encap. paint. Check labels on both paints to see if they say they recommend a window of time before recoating:. it’s often an actual window. Not before X and not after Y hours.
In the end if you are unsure, call an OLD painter for advice and a price. They are happy to help as it may be work for them. Warn them about the lead first.
b
Hello Brad,
Are plaster walls normally not straight or flat like drywall? I am pretty sure the living room is plaster, the walls are not flat so the light reflects off thr surface unevenly makes almost any paint job look not so great.
YEs, they sound old…the old timers used a long rail to try to make the mud flat but it never works perfectly.
One solution is to texture the walls. That’s something a pro drywaller will do: spray texture.
But try to think this way: old walls have charm.
Hiya
I am just wondering what is the best way to tackle my walls. A friend who said she did painting has painted most of my newly plastered house with plaster paint (great) however she has done it in stages and not blocks of areas and now there is lines everywhere. Is there anything I can use (like a stain blocker/primer) to paint over it to hide the lines?
Hi. I’m not sure I know what you mean ‘plaster paint’, but I’ll just assume primer and paint.
Those lines are sort of natural at the edges of the roller and can be made to disappear by a light touch of the roller after the wall has full coverage. We call this ‘back rolling’ which aid coverage and removes those lines.
I think a fresh coat applied like this will hide it. But if it’s 3-D, well, those are forever unless you scrape them or sand them. Latex paint really is not sand-able.
Good luck!
thanks for your reply. Yes plaster paint is a breathable primer they put on the newly plastered walls here in the UK. By 3D wall do you mean a whole room?
No i mean the little bumps of paint at the edges of the roller from squeezing the paint out.
Hi Brad!
I just bought an old house with plaster walls. The house kind of has an elderly smell to it.. The plaster is textured and in great shape. No stains that I can tell and the house was a non-smoking house. We are trying to get the smell out of the house, and part of that is with paint (I think).
Would you recommend something like BIN primer and SW latex paint? Or will that be going overboard given this scenario? Would latex primer give the same smell blocking effect?
Finally, how would you recommend cleaning the walls before paint? I’ve heard some say to just dust, some say to use a lightly damped sponge and water, some say to add dish soap, detergent, etc… I want to ensure the primer/paint sticks well without damaging the plaster, which I have never worked with before. Thank you!
Exactly: Bin plus paint. Please know that no paint is 100% smell blocker but shellac-based BIN(not the water-based type) is the stuff. It gets worse:
This BIN is super nasty. Please read my posts about respirators and have great ventilation. It’s messy and won’t come off skin until the skin ‘sheds’.
So.. what I would do is do ONE room this way, and see the result. The room will smell like paint for a few weeks so be patient before you go into other work.
Get quality rollers even tho you will toss them after you use Bin. The brushes can be budget, but not the crap from China. Keep tools and liquids from drying out as you work, esp overnight. Alchol base of BIN dries super fast. See my tools page for what I use.
Yes clean the walls, but just with a broom. If the old paint is latex and you are sure, you will not really need to worry about bonding. Always good to test in spots however.
Having written all this, I’m rethinking about cleaning: maybe try cleaning walls, ceiling and trim and floor with soap and hot water, rinse well…LOTS of towels on the floor. Then let dry and see if the smell is less.
Smells sure are the hardest thing to paint away, but you might have success.
PS if the BIN is too intense try some OIL-based primers known for odor blocking
Finally…call a pro it or a few pros…all older painters and see what they think. Since I’m not there, I can’t be sure if this is good advice, but it does have logic.
Good luck
b
Thank you so much for the response! Given the information you provided I think I will start with a more dynamic approach before touching Bin. Dehumidifier in the basement and replacement of all cloth/fabric materials in the house. Cleaning of all surfaces including walls (which I assume a very light wash is safe on plaster?).
After that I might tackle one room with a more basic latex based primer like Kilz, then go over that with latex paint. At that point I’ll evaluate and see if the smell is gone, or if I need to use a stronger primer.
The thing is, I’m not dealing with smoke or anything super powerful. Just the smell of “old.”
Last question. A friend warned me about using certain primers and paints on old plaster because it can “lock” moisture into a wall. Is there anything valid about that, or can you approach an old plaster wall with latex based primers/paints the same as drywall?
Again, thank you so much for your advice. I’ve been using your guides to purchase supplies!
I contacted the Ben Moore rep and learned there is no primer that is not oil-based that seals off odor AND lets moisture out. So you have to seal both or use latex primer which can breathe. Go with latex as the smell will vanish but moisture trapped could grow mold and devastate your house. My opinion there.
Thanks
Hi Brad,
Just bought a home, new England, built in the 20’s. Covered with wallpaper… under that is horsehair plaster. In two rooms, we’ve gotten all the wallpaper off. (We welcome any tips on removal). We’ve washed the walls. We’ve used joint compound to fill cracks or divots. We’ve sanded. Our plan was to then use Kilz oil based primer for two coats on walls and one on ceiling (which has some small cracks which We’ve used joint compound on). Then a coat of ceiling white and two coats on Ben Moore top notch on walls. A “pro” came into the house today and recommended gluing the walls, adding a layer of plaster, then using latex paint. I’m confused and exhausted from removing wallpaper. Also on a tight budget. Would love your advice. Thanks!
Great. Wallpaper: the key is water, time and more water, then it wants to fall off.
Steamers are faster. It’s just a chore.
Washed? Wet a section and touch and see if any sticky glue left. If so, wash again.
Kilz may be over kilz. I you have just walls and no stains, use a general primer, not drywall primer, just a latex wall primer. Stains? yes oil kills and shellac based kills for stains that bleed thru paint.
Primer on an old ceiling before paint I’d say.
gluing the walls? Don’t know what that is. Skim coat? Sure if you have to, but it may not be necessary if your plaster is holding, not cracking much.
Budget small or large, do buy quality and just take your time. Do one wall per day then go watch some hockey!
Good luck
Hi there. Due to years of roof leaks, an area of my plaster ceiling became cracked, I’ve chipped away what was loose, and it seems only the layers of paint were loose and the plaster itself is still sound (although stained brown). I will try to post a pic. Can I just prime the stained plaster and repaint?
Yes, but you must use a great stain blocking primer with a shellac base, not water-based. Oil-based might be ok. Now, the shellac is very messy and will drip in your face and it’s hard to get off. Read this and get the BIN primer. BIN also has a similar primer that’s water-based: don’t get that one. You want alcohol-based. Use rubbing alcohol to clean up. Good luck.
Brad – thanks for all this advice. Having read the thread, I still have a couple questions.
I have a 1920’s New England house with lath & plaster: horsehair plaster which is pretty grainy. The previous owner removed all the wallpaper and painted over with what I can tell is just latex paint, no primer. Nonetheless the plaster is in good shape, but has a few hairline cracks. I have refinished a couple walls by sanding down through the paint to the bare plaster veneer coat, then applying a skim coat of thinned Durabond joint compound over the entire wall surface, which dries very hard and seems to seal up the hairline cracks pretty well. I run the wet Durabond over with a roller with a coarse nap to give the surface a slightly rough finish, which also hides the minor imperfections in the wall joints/previous patches well. This technique was recommended to me by a New England painter who encounters this type of wall often to deal with small cracks without having to fill/patch them individually. Then a coat or two of interior latex paint (no primer). Is this a legitimate method? Or should I skip the Durabond and use primer?
Also, some of the walls have developed yellow-brown spots on the surface which I assume is mold (this happened during a particularly humid summer), so a mold-resistant primer/paint might be called for.
Thoughts?
Thanks
That’s all excellent. You could also spray the mud for a textured look which is nicer in my opinion than the roller texture, but if you like it… great
Yes it’s all a legit thing to do.
The yellowing should be sealed with an alcohol-based sealer primer. This is nasty stuff, and other lesser-powered stain-blocking primers MIGHT seal it but I use BIN shellac-based primer as nothing bleeds thru it…EVER. SOme primers may block it for a few years, then it creeps thru again. Not this bin. But be careful, there are two BINs. I need to write a post on this. This will do however: on smoke damage…same stuff.
Thank you Brad. FYI the Durabond method has held up so far over about 15 years, although a few new hairline cracks are developing, which I assume is normal house settling about which not much can be done. It is a fast method for “refinishing” old plaster that has had wallpaper removed which created a rough plaster surface with many pock marks where plaster came off with the paper.
Yes, settling and heat/cold with seasons. Wallpaper will leave glue too. If not too late, sponge and water over and over, but if already painted, then your texture will hide it.
Brad, what a great site! I just inherited my 1951 childhood home. The “paint”, or what I thought was paint was peeling because of moisture issues over the years with the roof and chimney. A painter (I now know to use that name loosely regarding his knowledge) began to scrap and the peeling just never ended. Small areas of peeling are now huge area. Then he tried painting but said it all stuck to the roller (no priming). He saw the brown coat and assumed this was paint coming off and was lead based, so he bailed completely. I tested it and now know it wasn’t paint, but the finish coat of the plaster. The finish coat had never been painted in 70 years! Where it isn’t scrapped, it’s still a nice shiny cream white, but needs washed. I know my mom washed the walls until she couldn’t and they always looked good. I have called in a plasterer to repair the finish coat. My question, once that’s done, and with the moisture issues now resolved, is it worth painting them? I don’t mind the color, and if that lasted with just washing for 70 years, will paint be as durable on them as that finish coat? Does painting have any benefit over the finish coat with plaster, or is just aesthetics? I’m sure with the amount of damage now done, the replaster won’t be cheap. And I can’t do the painting myself, will need to hire someone. Thanks so much.
Well, we always paint plaster. I have never heard, but I am delighted to hear, how this went over all the years. Amazing really.
I would guess that the cleaning was removing particles of the plaster and exposing fresh plaster…like sanding maybe.
I think interior paint is mostly for looks, but exterior obviously is much more.
So maybe live with it for a year or so and see if you want paint. Maybe you like the old way?
The skim coating won’t be that much if you find the right guy/gal. Get an older person who has done it for many years and ask for a reference.
Check Yelp and see what people are saying. All pros should at least have a facebook page.
Thanks for the interesting comment. Let me know if you need anything.
brad
Brad,
I have a question for you concerning plaster walls. I have a home that I am redoing that was built in the 1930s. Paint is peeling or not sufficiently sticking to the old plaster…..not really a big deal because I use a putty knife to scrape off the many layers of paint, they peal right off. Now my plan is to skim coat the walls. So should I first use a good quality water based (latex) primer on the pretty much bare plaster, then skim coat over the primed walls then prime the skim coat and paint. (Primer adheres to old plaster, mud adheres to new primer, then prime and paint). Or should I put the skim coat of mud directly on the old plaster, followed by primer and paint. Staining is not really an issue (Will the mud adhere better to the old mud plaster, primer adheres to new mud, then paint)?
Yes, drywall primer on the skim coat. You have it right. If in doubt buy a high bonding primer. Don’t take a chance…so bad if it peels off!
The mud should adhere to the old walls without any primer, but I have not seen your old walls. Call a drywall pro, and older man or woman in the biz for a long time and ask. Or write to a mud maker. That will confirm it. Then do a test …let your skim coat dry and see how the bonding is.
Hi Brad,
I have an old home built in 1918. It has plaster walls with horse hair. I had an ice dam break through and make the interior paint bubble and peel off of the wall. I’ve left it to dry for over a year now as I could see shadows of the lath showing through the plaster. There are also dark spots left behind from the water. I am ready to start the repair. Do I just need a good primer with KILZ in it? The plaster feels solid and there are no cracks. Can still see a bit of the lath, but it doesn’t feel damp.
Thank you
Sounds like you know what to do. Patch, sand, prime but use a stain-blocking primer. The water will probably stain and it will bleed through
At least spot prime with that where there was damage.
Thanks fella. The Zinsser red stain blocker is also a primer. It’s the doggies! So I’m thinking of double coating on all ceilings and skirting. And I think for piece of mind I will use the stain blocker on the walls but just one coat as they sem to be so good. Thanks for your feedback. Much appreciated x
Hi Brad, I wonder if you can help me.
I have bought a 1930’s house which is a yellow brown nicotine colour from years of abuse from the previous owners. The front room, the worst stained room – the ceiling has had 3 sugar soapings and will get 2 coats of Zinsser red as a stain blocker and undercoater. The walls were wallpapered. Under the wallpaper are clear decent plastered walls with no signs of nicotine having penetrated through!!! I don’t understand. From everything I’ve read, it would have penetrated the plaster wouldn’t it… (anyone who has been in, has said it’s the worst case of nicotine staining they’ve seen looking at the ceilings and believe me, it stank). Do I trust these walls? I thought I’d be able to see the nicotine under the wallpaper but the walls look amazingly good, clean and paintable. It’s tempting not to Zinsser when they look clean because it is so expensive. What would you recommend? We do know that the place was probably last decorated in the 70’s. Is it possible that whatever wallpaper they used acted as a nicotine block? Is it possible that the nicotine has seaped through, into the plaster but you can’t actually see it? I’m thoroughly confused about it. Thanks in advance
Hi. First, you have to wash and wash that tar off from the smoke. The primer you mentioned is good too and yes, a stain blocker is essential.
Lucky for you the wall paper protected the walls. Still prime with the same primer. I think you can go primer plus latex on walls, but on the rest, use oil over the primer.
The smell removal may be difficult. I’ve had failures to remove smoke smell. An top quality (don’t pinch penny) oil based paint on the ceiling is your best hope. What a nasty job, but latex won’t block any smell. The primer will help, but that’s not what primers do.
Some states have outlawed oil in gallons. Contact a paint store locally and see what they know.
In summary,
Don’t skip the wall primer!
Sounds like a pro job.. unless you are good and have time on your hands. I’d get a pro to spray all that primer, then spray ceilings with 2 coats of oil.
Good luck
B
Hi Brad,
Can we use Mad Dog moveable primer on bare old plaster patches when repairing peeling latex paint used over primer 21 years ago? Home is 120 yrs old, seasonal so we assume paint peeling due to freeze-thaw cycle through cold seasons. The mad dog works fantastic on wood exterior doors and trim with top coat of gloss for doors or solid stain on trim.
Thanks,
Dan &Leslie
Well, if it is a primer made for interiors, yes no problem. If for exteriors, you should not as it is toxic. You could open windows and move air for a few months while the exterior components off gas, but it’s a bit much.
Plus, you are assuming what caused the cracking. It could be other causes.
Gloss over primer? That’s new to me. Might be a big hassle when repaint time comes!
An old house has lots of things going on.
But get an interior primer that moves and you’ll be all set.
B
Ya will do. We also talked with Maddog and yes we used it on scraped peeling plaster. We think the house moves and may have to foam off the walls from the cellar to avoid moisture issues. We’re using a foam roller which is slick and effective. Yup windows open and wood range hot. An overnight dry time too.
We’re hopeful.
Leslie & Dan
Overnight drying, but weeks of off-gassing. Months sometimes.
Look at water barrier paint also. Also plastic solutions: real vapor barriers.
B
Hey Brad,
I’m so glad I stumbled onto your site! My wife and I just got married and moved into our home a few months ago. The house is an amazing 100yr old home that we were thrilled to find, but has the challenges of a century old home. The first job we’re tackling is painting our plaster bedroom walls, which we quickly realized were wallpapered and painted over. I found your article about painting plaster incredibly helpful, but as we’ve taken off the layers paint (and paper flowers) we found a very rough plaster base. It appears the walls were sanded at some point (circular ripples) before being refinished.
A few questions, we’re not getting down to a consistent layer; some portions we’re at plaster, others have a thin layer of paint. As we finish the wall should we treat it the same regardless of the exposed surface being paint or plaster?
Also, after reading your article I’m assuming sanding the ripples is the best option to smooth the wall, but I want to make sure their isn’t anything else we should consider to create a smooth painting surface.
p.s. I have a lead testing kit arriving tomorrow to check the base layer of paint.
Hi. Good to test for lead. I’m not sure what you mean by ‘treat the same’ each layer. I can’t see it so I’m stuck not being able to advise well, but I’ve seen plenty of horrors. Here’s what I would do.
Once the paper is all off, I’d skim coat. For this even I would hire a pro. If you want it to be right, do that. If not, I guess you would get the paper off and sparkle with drywall compound to make the areas the same, but honestly they won’t be the same. Paint later cannot save it if there is 3-D differences. I hope this helps. It sounds un-save-able if that is a word. I’d skim it.
Brad
Hello Brad,
Hoping you can give us some guidance. We have a home build in the 50’s with plaster walls. The current paint, done by the previous owner, is cracking and chipping in throughout the home. Some areas are quite large and the paint can be peeled away very easily, like peeling a hard boiled egg. These chips come off and leave a perfectly clean plaster wall. We have begun to scrap the paint away from all bubbled areas, but are confused about what to do next. While we can sand the edges and then apply the primer that you suggested, will this suffice or do we need to attempt to remove all of the paint from the walls in order to not have future peeling/chipping? THANK YOU!
Well, if you can, remove it all. It seems like you have poorly bonded paint…old and losing it’s grip. If you cannot, yes, spackle with drywall mud which is cheap and easy to sand. Spackle is good for small jobs…expensive and does not sand as well.
The problem is that the paint you did not get off now…. you know what I’m thinking?
If you want my honest opinion..it’s like a doctor without bedside manners.
I’d say rip all the walls off, have a company come in and give you new walls!
But if you can, chip away until it all comes off then skim coat the whole wall with the drywall mud. Best to get a pro for that and you can sand it.
Look at a Festool drywall sander on this page: worth it and has great re-sale.
Hi, Brad! Thanks for the great tips in the article.
My home was built in 1930, and I want to repaint the plaster walls in the upstairs bedroom. I would be repainting over ~6-year-old paint (not sure what type yet; I will do a test). However, upon examination, I found several areas of peeling paint (my guess is due to harsh season changes and lack of AC and heat upstairs, which will be remedied) and cracks in the corners of the walls (which contractors have said are from the house “settling.”)
We will repair all cracks and areas of peeling paint using your tips in the article, but I am stumped on how to prime and what primer to use. Should we use oil-based primer on the parts we will repair and treat the already painted areas like drywall, using a two-in-one primer paint over it? I want to prevent peeling as much as possible.
Any and all advice is welcome. Thank you for your time!
Compared to the questions I get, you have it easy! Those cracks are also from temp changes over the years. No worries. Just fill with spackle or drywall mud, let dry, sand, prime with any drywall primer, and paint like the rest of the walls. You don’t need any special primer unless you have stains or bonding issues, which it seems from what you wrote that you do not have.
Have fun.
b
Brad, you provide a great service. Thank you. I have a house built in 1958 with plaster board sheets. I’m repainting the bathroom ceiling and walls which currently have a Ben Moore latex bath paint with a satin like sheen. There is a Shower/tub in the room. What primer should I use In the bathroom over the existing latex … aqua lock, primelock, zinnsser bully’s rye 123, etc? So many choices! Also had some plaster repairs made to the ceiling and walls in the bedroom and living room. Which primer should I use on the repaired area before I topcoat with Ben Moore regal matte. Thanks very much.
You named it: Aqualock is my choice, but the others you mentioned are fine too. I guess the quesiton is oil or water-based primer. Unless you have a real mold problem, just use a good water based primer.
Same primer on walls as on patches. For new drywall…much area… why not buy low cost drywall primer… if you ever do new walls. Good luck!
Hey Brad – Pat here. Thanks so much for the valuable knowledge you share. I’m in the process of buying my first home (rental property to be) and it has plaster walls throughout as it was built in 1917. I’ve done my fair share of research but as a first time homebuyer and of a younger generation, plaster is very new to me. It seems to me as if the plaster was installed in not the greatest fashion with some lumps, clumps, and waves throughout the house. As for the lumps/clumps, I believe I can just sand those down. The real problem areas seem to be the corners where they are very clumpy and not clean edges at all…this is where I’m really stuck. Any advice on how to go about fixing these? Can I sand these down or just this need to be skimmed/redone? Thanks so much for your help! Love your site.
-Pat
I’m wondering if you can send pics. Sometimes I’ve seen old plaster that looks somewhat like you are describing, and it’s intentional. If it’s old. If not old and new, yes it sounds like a botch job.
In any case, to remove, yes sanding. I would not skim coat unless the full surface needed it. I’d patch where I sanded too far.
This will keep you busy!
Good luck and thanks for the nice words!
B
Stumbled upon you site for answers on painting my walls. It has been super informative, but I’m not sure I got the answer I was looking for or i took in too much information, that I’ve confused myself! So I have a 1941 colonial with all plaster walls, and in the dining room we took off the Original Wallpaper in the room. Nearly 80 years old! To find that these plaster walls have never been painted. After scraping off the glue and then washing the walls, they are so incredibly smooth. No cracks, no holes, they look like they were in a time capsule. And the plaster is such a nice clean creamy white. So my question is this, where do I start? Which primer? And paint? How many coats would you suggest of primer? I’m willing to spend the money to make sure we dont have any paint issues.
Thanks for your time!
Dan
Wow, nice story. You are all set to prime and paint. One coat of drywall primer if you have no stains. Do primer, look to see if any stains bleed through, then if they do, or if you see cracks you did not see before priming, spackle and, spot prime with the stain-blocking primer. Both at the top of this page.
Any paint, usually 2 coats.
Only one coat primer!
Get the best paints: Ben moore or S. Williams. You won’t lose color and you can easily wipe, even the flat paint usually.
Good luck.
b
B
Many thanks!
Part 2. I forgot to ask you about the weather factor. Do I need to wait for a dry weather (like summer). Now, it is like one day of rain and two or three days are dry/sunny. But the temp around 55/60.
Thanks
Definitely wait for dry warm weather. Not sure where you live, but summer is always best.
Hi Brad,
A very informative post, really. Thank you from a guy who knows very little about any of that. I’ve got a water leak problem (rather small, in my opinion) under one of the windows – the paint bubbles, which a scraped off and now I need to fix that spot. And your post gave my a clue – a) stain blocking primer, b) patching pre-mixed drywall compound, c) paint.
Now, I have a couple of questions. 1) should I use a mold resistant paint even though I don’t have mold at all? 2) I believe it is a plaster wall, but if I take a pic of it to HomeDepot, will they be able to tell for sure? Thank you very much.
…and sanding before primer… you did not mention that so I did !
Yes, mold paint is a good idea if it will be moist, but not if it was a one-time or 2 time accident.
Home Depot, not really. They are just people hired to sell stuff. Go with your photo to a paint store and they will definietly know.
Good luck!
b
ps, take a bit of the paint with you if you can
Hey Brad,
This site is amazing, thanks for your dedication. I’m new to DIY painting and finding this resource is like arriving at a safe haven.
I just bought a 1920s 3 family with horse hair plaster walls. They’ve been painted over a million times and have a fair amount of small holes, but also lots of imperfections, seams, and pock marks from dozens of mediocre paint jobs. We want to paint the walls, but short of applying all new dry wall, what can I do on a budget to fix the imperfections? Specifically:
1) Would adding a coat of primer help make the finished product smoother and flatter?
2) Should I go hard with a pole sander before priming to try to smooth things over or will that cause more problems?
3) To patch the holes from old drywall anchors and nails, which product do you recommend? The quick dry speckle or dry wall mud? Your answer here might influence whether or not I should prime the whole thing since the dry wall mud needs priming, right?
4) I searched your site about information about window sills and didn’t see much. What advice do you have about fixing up old, chipping sills? I’m thinking of chipping off what I can (keeping it wet for lead concerns). Hand sanding as best I can, and then try to rebuild a flat surface using a couple of coats of wood putty, then prime and paint. Would that work?
Thanks so much! You do great work!
Hi. Thanks for the nice words. I’ll answer in order:
1. There are some primers that are for high-build and this would be a good time to use one. But definitely do a test section to see that it’s what you want. Risk: losing a gallon of primer. Actually, you could probably thin that thick stuff down to a normal viscosity primer.
2. Definitely sand very well. Start with 80 grit and repeat with 120 or 150. Before priming for sure and between coats is best, but lightly to remove foreign matter that got in the paint.
3. Use drywall compound, ie mud. If you end up doing the whole wall, great. Get a really wide knife…10 or 12 inches. Look up on Youtube how to ‘skim coat’ and this will put you in good shape. The primer is after only: no need to prime before mud. I do get asked that!
4. Do you have lead? You need to check and get a respirator. Read my post on the main one we use: start with the filter kit which has outer and inner filters to make the expensive ones last longer. But yes, a sharp scraper and even paint remover if you have lead paint: you want that out of the house for future generations as well. No, don’t create a surface with wood putty. Ok to fill imperfections, but it’s not going to last if you ‘skim coat’. Nobody does that on trim.
Good luck and thanks again. Reply here if that was not clear.
b
ps the knife and all these things I mentioned are all on the tools page on this site. You can just use the search feature also.
This thread is so informative! We have a farm house that was built in the late 1880s and there is a closet and one bedroom in the upstairs that have a rough, sandy surface. Almost like concrete. I assume that they neglected to finish coat these walls and paper them, but the paper has since been removed and covered with nasty MDF paneling. Also, there are cracks all over the walls.
My question is, do these walls NEED to be finish coated or can we repair the cracks with the advice above and use a good primer to cover the rough plaster?
Wow, what a mess. But you can overcome. Without seeing it, I am guessing that if you patch rough spots, you’ll end up with a very uneven wall and with lots of mounds of good, new drywall compound.
Since you seem to be willing to do the painting from primer up to last finishing touches, I am guessing you can also learn to skim coat. This is tricky and is best done by a professional, but all you need is a big bucket of drywall compound and a VERY wide knife to make a new wall. I’m a bit under the weather, or I’d search and find you a youtube video on how to skim coat.
After the sanding of the new wall, dust well, mop floor of all dust and then primer + 2.
Let me know what you do? very curious!
B
Brad, I’ve scoured the internet for answers for our paint problem to no avail, until I found your blog. It sounds like you’re definitely an expert in this area, so I hope you can help. I have a 1930’s house with plaster walls. Walls had a crazed appearance in the bathroom on one wall. I attributed it to moisture from showering. Sanded the wall, applied DryDex Lightweight Joint Compound. After it dried, I sanded and applied Bin Zinser primer, then two coats Benjamin Moore premium interior semi gloss paint and primer. Wall looked great at first, and we made a point to open the adjacent window during showers, but within three weeks cracks have appeared again. I wonder if it didn’t dry enough between preparations? All the work was done in a 4 day period. Help! 🙂
Hi. The photo you sent is below…to help others in the future.
Four days is fine, it’s not rushed.
Somehow the moisture is getting under your paint. The products you used are all fine.
Here is my best guess, not having seen it obviously… Instead of sanding in the first place, you should have dug down a bit to see the health of the wallboard. I suspect it is soggy. But don’t fret yet. Hey, I’m a poet.
Do a small demo job: take a drill with a wide bit…maybe 1 inch and cut into it. If the old wall is not white, it’s probably growing something you don’t want in the wall and you will need to rip it out and get some new wallboard. Not that big of a deal…you can do it from what you wrote.
The fact that it took 3 weeks or so to crack tells me the moisture took time to get through. If it had bubbled right away or did anything wrong right away, slam dunk it’s wet. But do the test and let me know. Another pic will help.
If you are brave, cut a square out and dissect it in the painter’s lab. What fun! Lucky you.
Get back to me.
Hello Brad:
I have a house built in the 1950’s with plaster walls. Two years ago I had it professionally painted. A year later the ceilings outside both bathrooms started peeling paint. I had the painter return to repair. He said they cleaned and sealed prior to painting. Now the ceilings in those areas are peeling again. Is there a solution? I did not have this problem the first 30 years of living here!
My best guess is that the moisture escaping from a shower is too much for that paint. First, sand the peeling area and reprimer just that area…then repaint the all the ceiling with a bathroom paint…or just paint a big section so you don’t see the old vs new.
Try Zinssser. Then, use the fan if you have not been doing so.
Either the primer and/or paint they used is very susceptible to moisture. I bet it was not Ben Moore or S. Williams. Am i right? They would not have done this: I’ve never seen it. If I’m wrong please let me know.
Spending more upfront saves money in the long run!
Hello Brad: Thank you very much for getting back to me. It appears the paint they used was SW Pro Mar Ceiling Paint but I do not know what primer they used. I like your suggestion of using bathroom paint. Thanks again.
When I painted my 1949 textured plaster walls, (40 years ago!), the top thin textured layer of plaster started peeling off in places as the paint dried. I was covering a light color with a light color so I did not use a primer. I glued the pieces back up and carefully did a paint touch-up. So, I have been hesitant to ever “touch” these walls again, but they need to be painted! The walls are in good condition with no stains, cracks, or peeling and the glue has held! Thanks for any advise you can offer.
Fireplace wall in 1920’s home had wallpaper then paneling. Removed and was replastered 20 years ago.
Recently noticed patches of paint color changes. Not water stains, not damp to touch, just variance.
I used oil stain blocker on entire wall, waited a few days, then repainted.
Thought problem was solved but a week later it’s back – same places.
Did have chimney flashing problem last year and did have water on wall. Flashing redone and weather has been very dry all summer
Thoughts?
Can you send a pic to my email? What stain blocker did you use?
I’ll reply here when I hear more. This is very strange, but we’ll get to the bottom of it.
B
Hi Brad – great website. I have a house built in 1990, we bought in 2005. Master bath ceiling has peeled ever since we bought. Had handyman in to repaint with high end primer, but peeling persists. Could there be an incompatibility with primer coats? If latex primer was used first followed by an oil based primer, would that cause the peeling. My solution is to sand entire ceiling to drywall and then use a high end oil based primer. Am I on the right track?
I doubt it’s primers not bonding to each other. My guess without seeing it is … well, bad news. Sitting down? Wet wall board.
Cut a small chunk out and have a look. If powdery dry, then go with your idea of sanding right down to the rock and start over. Lot’s of work. Maybe easiest to rip out sheet rock and re-rock. If you do, get the green board just for baths. Yes good oil primer…and ventilate for 1/2 hr after a shower.
Good luck!
Hi there! I was wondering if you suggest acrylic versus latex paint for plaster walls? I know they make combination paints as well that are both acrylic and latex. We’re about to tackle our new (to us!) circa 1935 plaster walls and was just curious if one was better than the other or if we should go with a combination. Thanks so much for any help you can offer!
Latex and acrylic are almost the same word. Latex is usually used to mean water-based…water is the ‘solvent’. SOmtimes oil is the solvent and that’s generally known as ‘alkyd’ paint. These are not exact meanings, but just to clarify your question, I mention it. The acrylic is what is carried by the water, and what is on the wall when the water evaporates. I think you may mean primer and paint in one?
In any case, you have great old walls. You need to know what paint is on them now (the topmost coat). Do the test in this post with acetone or alcohol. If oil, you must prime with a good bonding Primer like STIX and you must lightly sand first …all for bonding. If not oil, just put a good basic primer and your favorite paint.
The walls are likely plaster as most of the house is. The bath has been renovated so I’m not sure. I seems like the ceiling may have been replaced with sheet rock but again not sure… Both bubble
Hi, I have two concerns with my 1951 home. First is the bathroom. The prior owner remodeled and painted over what appears to be either a hi gloss paint or oil. The problem is when I shower the walls and ceiling paint bubbles. After a opening the door it disapates and most of it resolves but not all of it. I can press on the bubbles and they flatten or move. What is your best suggestion to resolve it, in addition to adding a fan? My second issue is a textured (c swirl) plaster wall with cracks. I want to paint but first I need to fix it and determine if it was from a possible renovation or if it is a structural issue. I will want to restore the texture too. My suspicion, since the baseboard appears to be pieced together that it was renovated. I wanted to include pics but couldn’t determine how to forward them. Thanks for your insight.
Hi. Yes, this is not uncommon. The bubbles often come when the wall is moist, but then settle back. In other rooms, away from the bathroom, the paint itself is the moisture that goes into the wall. Then as the wall dries, no more bubbles ever.
Your situation is not going to go away….from where I sit of course, I’m guessing.
Yes an exhaust fan or window are required by code, but it’s not like you are going to open your window in winter.
I would not start with a new fan installation.
I’d scrape off.. sorry, this is going to hurt said the bedside manner specialist… scrape it all down to the sheetrock.
Prime it with an oil-based primer then use bathroom paint.
You can always do a test area to see: pick a bubble area, scrape, prime paint and shower with much steam to be sure it works before doing it all.
Next issue cracks. Email the pics in reply to what I sent you.
Cracks if small: just use your finger and push in drywall mud…easy. Prime, paint.
More when I see photos. Close up of cracks with a coin for scale if you can.
Hi! Thanks for the great website! My husband and I tried to put up peel and stick tile as a backsplash behind our sink, but it looked terrible, so we took it off. Problem was, we ripped up some of he paint off the wall in the process, exposing raw plaster here and there. So now we are planning on painting the backsplash area and the whole wall, but learned, from this page, that we need to put up primer first, over the raw plaster. My question is: Should we paint the entire wall with primer, or just the section that includes the raw plaster? Thank you!
Hi. This won’t be hard. If the paper came off the sheetrock, you need to patch with joint compound aka “mud”. WHen sanded, you need to prime that and any ‘raw plaster’ showing only. Remember if the plater showing is not smooth, you will see ever imperfection in your painted surface: just a different color.
If the old wall still has paint in good shape, you don’t need a primer on that unless you want: it can be helpful to have the whole thing white before you put on your top-coats. Good luck.
Hi Brad
We bought a home built in 1954, plaster walls throughout. The bathrooms are peeling, ceiling to floor in just 4 short weeks of the move in. One bathroom has a ventilation fan, the other does not.
We wondered if it would be better to rip out all the plaster and replace with Sheetrock or try to scrape and repaint?
Do you mean fresh paint is peeling? You need to get a few pros to give estimates: get older guys and talk to them first to see what their experience with this is. Yes, it may be best to rip it out if it’s all wet. You cannot paint wet walls, that’s an axiom. You can always scrape a section, repaint and watch it. In fact, do that as a test to show the pros. Good luck. Let me know? Thanks
Hey Brad! My husband and I recently purchased a home built around 1760, we are finding as we take down wallpaper in some rooms that there are beautiful plaster walls underneath. Your notes and recommendations for prepping and priming the plaster walls are so helpful!! We believe we have horsehair plaster walls, that appear to be in pretty good condition in most rooms, just a bit uneven in color. I was wondering if you could recommend a paint roller style or brand to apply our paint colors to keep a somewhat smooth finish? Considering going with eggshell finish but don’t want the subtle texture that rollers sometimes leave. Any help would be awesome, thank you!!
Hi. What a nice find. Two things come to mind right away: spray (I know, big involvement) and Benjamin Moore’s Advance which comes in matte, satin and semi-gloss. When rolled, it does not hold the texture/dimple pattern, but slowly evens out and ‘enamalizes’ which means it becomes totally level, or flat, but not in the sheen sense of the word flat.
Spraying other latex paints would get you there too, but still, there will be some feel to the wall. My advice, try gallon of satin (most like eggshell in this line of paint) and roll on some samples. See if I’m right… I have never used Advance on walls, but I’m very confident in this answer. Let me know back here? Thanks and good luck! PS, with that link above, you just email the seller in the right-hand column with your color number and name. The price is amazingly decent for online paint.
Hi, about 10 years ago we removed the majority of the painted over wallpaper on the plaster walls in our dining room. Anything that was really adhered to the wall stayed on the wall. We skim coated the entire room, then later primed and painted. I’ve been repainting the woodwork and my painters tape didn’t want to stay on the walls. When I took the tape off, some wall paint came off with it. The paint has always felt tacky in this room, and after pulling some of the paint off with painters tape, I’m realizing that I can peel big chunks of paint off the wall. What should I do now? I don’t know whether to scrape off just the paint, or scrape off everything down to the plaster. The wall under the paint feels completely dry. Thanks!
Hi. Yes, it feels dry, but it still may be too moist to paint. Do you know what paint it is (do you still have some?) I guess you can go 2 ways. One is to go the labor intensive way and yes, as you suggest, scrape it all off. I hope it’s just one room. Often a paint district rep will come to look at it for no fee: it’s what they do. I hope you know the paint you used: they’ll want to be sure it’s their problem. Anyway, the other way is to re-prime and paint. Perhaps this seals in any moisture still there, and you’ll have the same problem, but maybe not, and this would be much easier. Use Prime-Lock, the oil-based strain blocking primer…it’s is simply the best, by Ben Moore. Then use any paint you like. Do a test in a section. Let the primer dry fully, paint twice then let it cure (keep it warm for a few days) then test the adhesion. Let me know? Good luck. -brad
I’ll try the test area first. I will try it where I’ve already scraped off the paint, and also where I have not. And yes, I still have the paint, and it’s only one room! Can it still have moisture 10 years later? Thanks for the fast response!
Hi, Brad. I appreciate your insight and great information. My question deals with my bathroom ceiling.
My house was built in 1955 and has plaster walls and ceilings. The previous owner used a textured paint on the bathroom ceiling, but did not have good ventilation so there was some mold. I’ve used a mold killing spray product to kill the mold and have fixed the ventilation problem, but don’t know how to best paint over the stains that remain. Any thoughts on how to best prime and paint for a permanent fix?
Good work to get that much done. Sounds correct. Now, prime with Prime Lock, an oil-based stain blocker. You have killed the mold, or I’d say use Zinsser Mold Killing Primer instead. Either one will be good. I’d finish up with paint made to inhibit mold. Please see this post. Let me know if this is not clear. Good luck.
I have a house built in 1956. It is cinder block construction and plastered inside walls. I am not sure of the insulation material used. On the outside east wall the paint on the inside dining room wall peels. It peels within months of painting. And it also goes back to the same color layer which I have had tested and it is not lead based. And that layer is the original paint used. There is no other layer beneath. However I don’t know if it is oil based. It only peels on that wall. What should I do to stop it from peeling in that wall? I have thought that it might be moisture in the cinder block causing this. If it is, what can it do.
Hi. Well, I hate to bear bad news, but you are right about the moisture, I’m afriad. Paint will not adhere to moist surfaces and the water vapor will keep coming through until that wall is dry which may be never.
Can you find how it is getting wet? Soaking up from the ground? Dripping from roof? Hard one.
I’d say call an old time building contractor and get a free estimate on how to handle this.
If you can bear covered walls, perhaps lay cedar over it… like a cedar closet look. Paneling would be the least expensive if you don’t hate that.
Good luck… Let me know!
Brad
Hi Brad,
So my husband and I bought this house built in 1946. It’s our first home that we are able to do what we want with. Well the upstairs is a cape cod style and there’s ugly old brown paneling on the walls. Most of it is falling down already but I tore some down and there’s a few lines of some dark brown glue ( or whatever they used) under each panel so far. I don’t see any cracks though. How should I go about taking the glue off and ready for primer?
Also, my husband painted our living room ceiling white but you can see every bit of texture through it. it’s horrible. All the plaster ceilings throughout the entire house has lines going every which way so is there a way to make it not show through a primer? My husband wants to just spackle the ceiling but I’m not sure…
Please refer me to some products to use for primer on the walls too please. I’m not worried about the smells or fumes…
p.s. I hate plaster
-JK
Hi. I understand that the textured wall is 3-D, right? He’s probably right about a new coat of mud, but applied as what we call ‘skim coat’. That means going over the whole thing with a wide knife and smearing on drywall compound, then sanding. This may need 2 coats to make smooth. It’s a huge job and one I would not do for myself even tho I’ve been doing things like this for decades. Ceilings are the hardest and to get it smooth takes an experienced hand: a real pro, not some 20-something hungry to take any job.
Primers and paints don’t fill cracks or even out texture…they just coat the surface. I’ve never tried some of the paints that promise both… I’d not trust it. So I’d say do the skim coating, then primer (simple drywall primer) and one coat of Ben Moores Ceiling White. If primer is white, that paint will be fine as one last coat.
On the paneling, the glue will have to be scraped. On our main painting tools post, I point out a ‘5-in-1’ tool: very sharp and will shave off the glue. Another hard job.
This will keep you out of the pool halls for the summer!!
Good luck,
Brad
Hi Brad,
I have a 1899 Queen Anne in Colorado (very dry) with plaster walls throughout. All the rooms upstairs have cracks, some larger than others, and a few layers of wallpaper to boot. I have managed to get about half the wallpaper off down to the plaster in each of the rooms. The remaining wallpaper is painted and a real bear to remove. Last weekend I had a drywall man, who also said he did plaster work, look at the walls. He said that I didn’t have to finish removing the wallpaper. He said if I painted each of the rooms with Valspar PVA drywall primer, he could skim coat the walls down to a smooth/mostly smooth finish (it would take two layers). He said the trick is the PVA primer. I read the specifics for the Valspar PVA and it seems possible that it could cover both wallpaper/painted wallpaper and plaster. It certainly mentions that the product “can be used over bare or previously painted drywall, plaster, wood and masonry plaster.” What are your thoughts to this process as presented by this drywall/plaster man?
Hi
There is no easy way to get off wallpaper. Whoever thought that up? But I’ve seen some 100+ years old, and still nice.
Skim coating could be the answer: very expensive, but very nice if your guy is good. Go look at some of his previous work if you can before you buy. I would think Kilz Original would be better for priming, but if you trust him, … Also, ask local paint store owners, managers and you can ask to talk to the district rep. Benjamin Moore and S.Williams generally hire very good people. Good luck and let us know!
–B
Hello,
I have an older home with plaster walls. I took the wallpaper off and we repaired parts of the wall. Now we are ready to paint. I started with 1-2-3 primer and I have orangish stains coming through still. Do I need to do 2 coats of primer? Or do I need to use an oil based primer? I don’t really want to use an oil based primer because I have a small child in the home.
Hi and thanks for writing. I think you are ready to paint. Sometimes the primer will show the stain, but if you test with your top coat, you may find that the primer has done its job. 123 is a very good stain blocker and you were right to choose it. So do some testing. If the stain comes through one coat it will come through 10 or 100. You will have to use more stain blocking power. I’d jump to the nuclear option in that case: BIN which is alcohol based. See my “primer” posts for the link. Search for bin. The alcohol will evaporate fast. Smart to keep the child out of the house and open windows for an hour, but this stuff off-gasses quickly. Let me know if any problems and good luck!
Hi, I’ve just removed paint & wallpaper from my ~1920 browncoat plaster walls here in Oregon. There was no plaster finish coat, I think the original paint was possibly calcimine? Anyway I’ve gotten off as much as I can, and in the process unleashed some godawful stench — decades of cigarettes, and some staining around cracks near the door. I’ve spot primed damaged areas with BIN before I patch & tape. Should I BIN everything to seal? Before or after skim coat?
Thanks much, Alan
Yes Alan, you got it spot on. A full coat of the best stainblocker out there: BIN which is alcohol based and very nasty (read about the alchol based version which we use on all wood ‘knots” here, and here is a 5-gallon pale of water-based product), or the latex version in KILZ, also very good and easy to clean. Lay it on in a heavy coat.
You would block those stains and smells with those for sure. Warning on the alchol-based primer: deadly if you breathe it too much! so open windows and see my post on respirators: I pointed to the one for you, and these are good when bleaching the bathroom too etc. I wear this mask for anything I think the EPA lies about: so much toxic stuff in a paint store (we were told for years we were safe, which was a lie).
Now, you could prime after a skim coat and this would do the priming for both the new skim and the old smelly layer. Normally, I would do this, but since you have the smell, prime twice: once for the existing mess, then your skim coat or drywall. Then do your 2 coats of color. Done.
Easy? No, not this time, but you need to make sure of blocking that smell. Note that that smell will now try to get out in other ways if it can: up and back and out the sides. So, after you are all done, maybe put the same sealer on the backs of those walls: by this I mean the adjacent rooms when you get to them. Good to have that 5 gallon pale I’d guess. Use your nose in the meantime to see if any smells get out. Wait a couple of months for all the new paint to off-gas. Even go above and below the wall with your nose, if you can.
Brad:
Thanks for getting back to me so quickly: I think if you copy the link above and paste you should see a good picture of the problem.
The ceiling has about a 60 degree slant at the top – which is where you will see shadows of the lath extending from the corner for another 8 feet. The shadows also do extend downward toward the radiator and slightly across the adjacent wall, also somewhat across the ceiling above the radiator. The walls and ceiling are old plaster painted with latex. The walls had been previously papered ( approximately 50 years +-) with vinyl paper.
Mike
Mike sent this photo:
https://www.bradthepainter.com/wp-content/uploads/2019/01/Mikes-wall.jpeg
I’m now sure it is not mold, but from the photo I cannot test of course. I’ve seen this many times: it is just the intense heat from the radiator creating an opening for dust to enter the wall and stain it. My approach: just paint it and if the stain bleeds through, do spot priming with BIN, the shellac (alcohol based) primer. Nasty stuff, seals everything except Congress’ big mouth!
Hello:
I have plaster walls throughout the house, circa 1860, and have noticed a dark patina above and around the walls of cast iron radiators, hot water, not steam. The dark patina shows the outlines of the underlining lath. The house is only mildly insulated. Could the dark skeletal image of the lath on the walls be caused by mold or the combination of cold plaster and rising hot air?
I notice the further along the wall from the radiator the less dark is the image. Also, the ceiling directly above the radiator does not shows signs of darkness.
I suppose I could wait until warmer weather, clean the walls, and see what happens but would like to attack the problem now.
Hi Mike. Depending on your location and atmosphere (near water?), and age of last paint job I would think it could be mold, but that is obvious: black spots, colonies of cells. If you can send a pic, that would help me, but for now, I’m guessing the on/off heat cycle near the radiators has allowed common dust to settle into the wall leaving a permanent mark. This does happen over time. If this is the case, we hope it is, just paint a test section with your top coat and see if the mark bleeds thru. Certainly, not a bad idea to hit it with a bleach solution first, but please open all windows for some time and/or wear a chemical respirator. Bleach is a deadly poison. I have a post recommending the best respirator for the money. When you are done, if you can reply here, and I can post the pics of before and after. This will help others in the future. Good luck!
Hello,
I will be painting my bedroom wall, which is drywall or plaster, my house was built in 1920 and I think my bedroom has the original walls. What would be the best sheen to use? Should I use a primer, the walls are white.
Hi Jason. Unless the walls are pristine, which I doubt at 100 years old, you would want to lay a primer on: this seals any stains and ensures your final paint will not have stains (latex paint will not do this for you). So, have a look at some low-toxic primers with some sealing qualities. They are not too expensive and you can apply quickly.
Sheen is totally up to you: flat is nice unless you have little ones with messy hands on walls. If so, eggshell still looks nice and you can clean it well. Some flats today, esp Ben Moore, can also be cleaned but may show some wipe marks.
Good luck. Let us know the result. Photos before and after are always helpful to others.
Brad
Hi, I have taken all the painted wallpaper and glue off this old plaster wall. Cleanned real well with TSP. The old walls are very smooth with few waves. My question is do I need to sand all these walls and ceiling or can I just use a good oil based primer over these walls without sanding everything down. Will the primer adhere to these slick walls? Thanks in advance
Hi Charlie. You sound like you are all set to prime. Why oil based? Not necessary from what I can tell. Do you have water stains? Just use basic drywall primer and if stained areas, use BIN or some quality sealer. Stains will bleed through the primer and all paints forever, so you have to seal.
If in any doubt, do some drywall primer in one square meter, let dry, put some paint and see if you like it. The hard work is done !
Have fun.
I have a hallway that I’ve scraped the paint and repaired the cracks in the plaster. Now I’m almost ready to paint. My question, I know I need to wash the walls after all the sanding but did I also wash over the repaired areas..making them moist again?
Well, don’t really ‘wash’. Is it greasy? If it is just dusty, no need for water..in fact you’ll damage drywall and patches with water. Just use broom at first, then maybe vacuum, then use dry rag or wide dry paintbrush type tool, then mop floor (so you don’t kick dust up into wet primer/paint).
So do all this after the last of the sanding is done. How to make sure it’s done? Use a good light up close to see the sanding/patching job.
Hope I helped!
Brad
Hi Brad,
We’ve bought a fairly new home with plaster walls and as we begin to paint the very white walls, we’d like to know what brand/s you recommend for drywall plaster.
Thinking of using RustOLeum.
Thanks! Elaine and Steve
Hi and thanks for writing.
I am not sure if the walls are ‘very white’ because they have new plaster (unpainted) or white paint.
If paint, just have at your favorite (check out the Benjamin Moore Historical Series—all warm and soft)
If plaster, then use the primer I mentioned in the article above, then paint as you like.
Key point is that some primers also seal stains: if you don’t have stains, just use the simple primer (not primer-sealer).
Yes, the Rustoleum is a good one and there are many others as well. Stay well-ventilated, like the Rolling Stones! Get it?! Ha ha.
Thank you! Will go that route.
Obliged,
A
The images were painted on raw plaster. The wall, other than the images, is not painted.
Got it.
So my advice would be to paint around the images with a small artist’s brush, then a larger brush as you have room, then roller for 3 coats: 1 primer, 2 color.
To clean the images, probably a damp sponge/rag. Test a small spot to see if water dissolves the paint: I bet it will not.
Good luck.
B
Hey Brad,
Here is a full shot of the plaster wall with simple mural on it and two close ups of the birds in the mural. How would I brighten, or clean the white background of the mural wall while saving the artwork on it? Can I do a wash over it all to give it all an aged look and then seal it? I am at a loss as to how to attack this. The other walls have nothing painted on them so I was going to follow your instructions for painting plaster walls but this one must be handled differently.
Thanks,
A
Hi again.
What is the mural attached to? A painted wall? Or plaster?
If it is a painted wall I would suggest carefully cleaning around the images and painting carefully around the images. Even if it is a plaster wall I would suggest the site. But as for the images, I would take a damp soft cloth and carefully clean it.
Remember that if the wall is already painted, it does not necessarily need a primer. The primer never hurts, and it depends on the color that you want to apply but is not necessary to seal anything if the wall is not porus. Primer and sealer is only for a porous wall as you know.
Brad
Hello Brad,
We are currently living in a 100 year old remodeled farmhouse. Our GC recommended a flat plaster finish. The issues we are experiencing, first the new plaster doesn’t look smooth in areas, you can see where the trowel was stopped causing fine ridges. Our contractors painter painted directly over the plaster with a primer/paint mix. The paint job everywhere looks very patchy and streaky especially on the ceilings, (the ceilings are low to where the average height person like myself can reach them). What would you recommend to fix this ? Thank you so much for your time 🙂
Felicia
The painters should have known that it needed more sanding. Sounds like there was confusiuon: usually the ‘mudders’ aka drywall people do ALL the sanding and painters do none.
To fix? Hard to say who should do it, but the ridges need to be sanded down, then primed and painted. Probably to match the rest that was not sanded, you’ll need one overall coat.
Sorry for the bad news. But just do it and you’ll laugh some day.
That painter should have known.
Good luck.
b
We are moving into a home that was built in 1960 by a man who was a Colonial Williamsburg enthusiast. All of the walls are raw plaster with the trim being the only thing painted. The walls now are all dingy. I believe they are lime plaster. I assume following the instructions on your site will work for us when we go to paint the walls but there is one wall in the dining room that has a mural painted directly onto the wall. I would like to save the image but the wall itself is dingy like all of the others. Is there any technique I can use to either bring back the wall to a brighter white or seal the whole wall with some tinted sealer that will give the plaster an antiqued color but still allow the image to be retained?
Hi. Without seeing the wall, I’d say ‘no’ from within the world of painters, but I am sure that there are sealants that are used in professional sign-making etc… That can seal it for you. You don’t want it to yellow over the years, and that is going to be hard to find. All those old houses with dark wood trim were not always that way: the varnish darkened. For many years, it was much lighter. But chemistry has come a long way.
Send a photo if you like and I’ll ask my painter buddies around the world for a recommendation. It is not what we do ordinarily. An art store would be a good first stop. They chat too.
I also know a woman who restores old Tibetan art. That is very expensive…museum-level work, but if you find out what they use to clean the paints, you could do it yourself perhaps.
Good luck and thanks again.
Brad
ps, yes, the primers we recommend will seal in the other plaster walls’ dingy spots. Buy a small can and test on the worst spots, then get more. Try to stay as low-toxin as you can and open windows etc to stay healthy.
Hey Brad – thanks for the article and all the info you share. Just bought a home built in 1917 with plaster throughout…first time homebuyer so I’m new to this but haven’t been able to find an answer in all the research I’ve done. The plaster throughout the home looks like it was done somewhat poorly, with clumps and globs throughout the walls but the corners specifically seem to be the biggest problem area. From what I’ve found it sounds sanding may be the answer for the flat portion of the wall, but do you have any advice for the corners? Thanks again!